

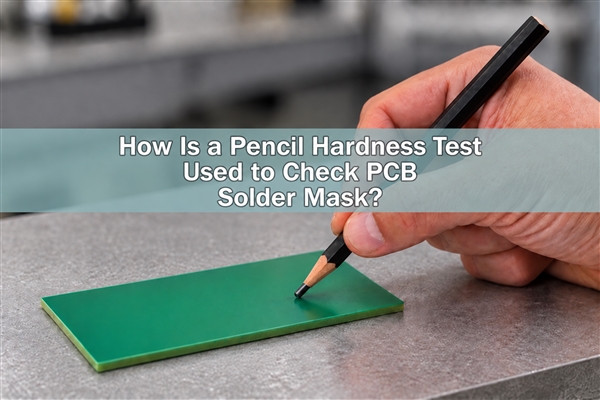
A pencil hardness test checks how a cured solder mask resists damage from a prepared graphite pencil. A useful result identifies the pencil grade, test method and damage endpoint. A dark graphite line is not automatically a scratch, and a hard surface does not prove that the coating is firmly bonded to the PCB.
What Does a Pencil Hardness Test Measure on Solder Mask?
The test gives an ordinal coating-hardness result: one grade is harder or softer than another under the chosen procedure. It does not measure the hardness of the copper or laminate underneath. It also does not provide a numerical bond strength, abrasion lifetime or insulation rating.
For PCB production, its value is detecting a change in the cured mask’s resistance to local mechanical damage. An unexpectedly soft result calls for investigation of the material, cure history and test setup. It is not enough by itself to identify the cause. Keep pencil testing on an approved coupon or sacrificial board area; a destructive test mark should not become an unexplained defect on a delivered board.
Which Pencil Hardness Test Standard Applies to PCBs?
IPC-TM-650 2.4.27.2 is the solder mask abrasion pencil method. ASTM D3363 covers film hardness by pencil testing, while ISO 15184 addresses paint and varnish film hardness. The purchase specification determines which pencil hardness test standard and revision apply. These references are not interchangeable simply because each uses a pencil.
An ASTM D3363 pencil hardness test requested on a drawing must retain that method’s conditions and endpoint. Do not substitute an IPC result without agreement. Equally, do not import a tester’s advertised 750 g loading into the IPC method as though the IPC document specified that number. Record the actual procedure, whether testing is manual or instrumented, and the applicable loading arrangement.
A pencil hardness test for coatings is useful across several industries, but a painted metal panel is not automatically representative of solder mask on a patterned board. Copper topography, mask thickness and sample support can change the local test conditions.
How Should Solder Mask Be Cured before Testing?
Test after the specified final cure and conditioning, not immediately after a tack-dry stage. Use the solder mask manufacturer’s current process sheet for the actual formulation, mixing ratio, coating thickness and cure sequence. An oven setpoint is not the same as the temperature experienced by the board; loading and thermal mass affect the heating history.
Keep the sample traceable to the production lot. Record the ink identity and batch, final-cure equipment or cycle reference, board-temperature evidence where required, cooling interval and test environment. A coupon cured separately from the boards may characterize that coupon rather than the delivered lot.
For FR4 PCBs, retain a representative mask-covered region and support it during testing. For metal-core PCBs, the metal-backed construction makes it especially important not to assume that the same oven setting produces the same board heating history. This distinction concerns curing the coating, not measuring aluminum hardness.
Do not keep extending the bake until a pencil result passes. Additional heat can affect other mask properties and downstream processing. A suspected under-cure requires a controlled review of the approved process window before any rework.
What Do the Pencil Hardness Grades Mean?
The pencil hardness test scale progresses from softer B grades through HB and F to harder H grades. Within the B series, a larger number is softer; within the H series, a larger number is harder. Thus 2B is softer than HB, and 3H is harder than H. These are ordered categories, not equal numerical intervals.
| Grade group | Relative direction | Reporting implication |
|---|---|---|
| 4B, 3B, 2B, B | Increasing hardness toward B | Soft grades still need the same tip preparation and procedure. |
| HB, F, H | Intermediate progression | F is a separate grade; do not replace it with HB or H. |
| 2H, 3H, 4H, 5H, 6H | Increasing hardness toward 6H | A reported grade must identify the damage endpoint and method. |
A 6H result is not twice as hard as 3H. Comparisons also depend on pencil manufacturer and batch. Keep a consistent, suitable pencil set for routine comparisons and agree on the set when resolving results between laboratories. The graphite core is commonly called pencil lead; it is not metallic lead.
How Should You Prepare the Pencil and Test Board?
A pencil hardness test kit needs a graded pencil set, suitable tip-preparation tools, firm sample support and adequate illumination for examining the track. A pencil hardness tester or guide can control geometry, but the fixture must match the selected procedure. A writing-sharp conical point is unsuitable for a method that requires a flat prepared end.
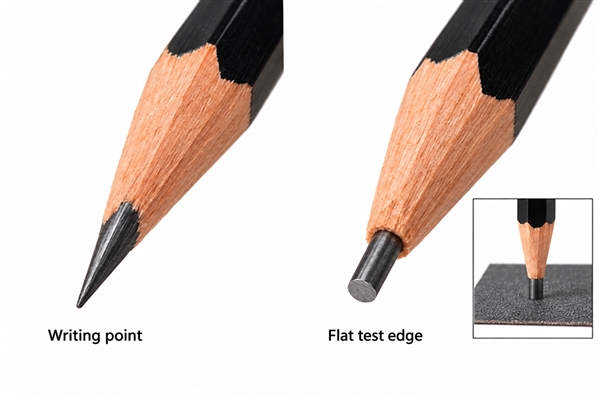
Expose and prepare the graphite according to the selected method. Flatten its end square to the pencil axis and inspect for chips or a rounded edge. Reprepare a worn or damaged end rather than carrying it through several measurements. Keep abrasive particles away from the mask because loose grit can create a misleading track.
Select a clean, level mask-covered area away from holes, exposed pads, legend ink and existing damage. On HDI PCBs, narrow mask dams and dense openings may leave no suitable uninterrupted track. An agreed representative coupon is preferable to forcing the test across pad edges. Record whether the mask is over copper or laminate, since those locations need not have identical film thickness or support.
How to Do a Pencil Hardness Test?
The pencil hardness test procedure must follow the method named in the inspection plan. For the IPC solder mask pencil method, the essential sequence is:
- Place the coated sample on a firm, horizontal support.
- Begin with the hardest pencil in the specified series and position it at 45 degrees to the surface.
- Push away with consistent downward and forward pressure over the specified 6.4 mm stroke.
- Examine the track, then progress to softer grades until the coating is no longer cut or gouged.
- Record the hardest grade that does not cut or gouge, together with the method and observations.
Keep subsequent tracks separate from earlier damage. Recheck pencil preparation when a result is irregular. Apply the required repetition and acceptance rules from the agreed inspection instruction; do not invent a universal sample count. When a customer specifies an instrumented ASTM or ISO procedure instead, use that procedure rather than combining selected parts of different methods.
How Can You Tell a Scratch from a Gouge?
Examine the coating, not just the color of the track. Graphite can transfer to an intact surface. Remove residue only by a method compatible with the coating and test procedure, then inspect under controlled lighting and the specified viewing conditions. Aggressive rubbing or solvent cleaning can change the evidence.
| Observation | What to check | How to record it |
|---|---|---|
| Dark line with no visible film disruption | Whether the mark is removable graphite rather than coating damage | Graphite transfer; record the post-cleaning observation |
| Persistent surface scoring | A real disturbed track remaining in the coating surface | Scratch observation, with grade and method-specific endpoint |
| Coating cut or displaced | Depth and extent of disruption; whether the underlying surface is exposed | Cut/gouge observation; note substrate exposure separately |
| Flaking or lifting beside the track | Possible loss of adhesion as well as damage to the film | Describe the lifting and initiate a separate adhesion evaluation |
A pencil scratch hardness test and a gouge assessment can produce different endpoints. Do not collapse them into one unlabeled number. The operational definitions in the specified standard control the result; the observation descriptions above help preserve evidence, not replace those definitions.
Photograph questionable tracks with scale, illumination and location identified. A close-up without the pencil grade or sample identity cannot resolve a dispute. If two inspectors disagree, compare the same prepared track under the same conditions before changing the process.
What Pencil Hardness Should Solder Mask Pass?
Use the contractual minimum for the approved solder mask system and stated test method. There is no defensible rule that every PCB mask, color and formulation must achieve the same grade merely because a different product’s data sheet lists it. A manufacturer’s typical result and your purchase acceptance limit are different pieces of information.
Write the requirement as a complete combination: material or approved system, method and revision, conditioning, endpoint and minimum grade. If the drawing only says “pencil hardness: 6H,” clarify the missing conditions before accepting or rejecting a lot. Hardness alone cannot establish solder resistance, chemical resistance or long-term electrical performance.
What Should a Pencil Hardness Test Report Include?
A useful report allows another inspector to understand the result without reconstructing the test from memory. Retain the individual observations, not just a final pass box.
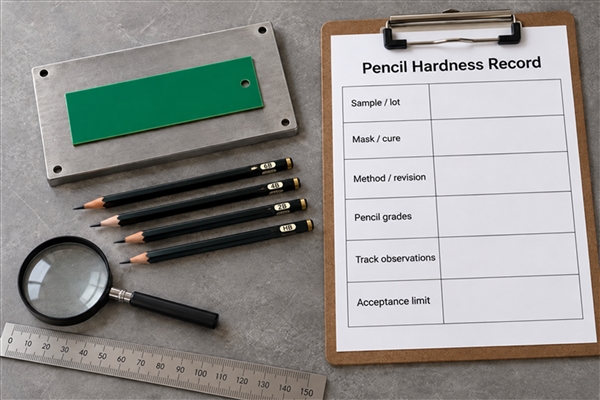
| Record | Required detail | Reason |
|---|---|---|
| Sample identity | Part/revision, lot, coupon or board number, test location | Connects the result to the correct production material |
| Coating condition | Mask formulation/batch, thickness evidence where required, cure and conditioning references | Separates process condition from pencil variation |
| Test setup | Method/revision, pencil make and grades, tip preparation, manual or fixture setup | Makes the result reproducible |
| Observations | Grades attempted, scratch/cut/gouge or residue, photographs and repeat results | Preserves the evidence supporting the endpoint |
| Disposition | Specified limit, result, inspector/date and any nonconformance reference | Explains why the lot passed, was held or required review |
For example, a demonstration record might state “3H: no cut; 4H: cut observed; endpoint 3H under the recorded method.” That example explains reporting only; it is not a BestPCBs production result or a recommended acceptance limit. If the hardest available pencil causes no qualifying damage, identify the upper test limit rather than claiming an untested higher grade.
Why Can Pencil Hardness Results Differ?
First check the measurement conditions: pencil brand or batch, worn edge, angle, pressure, track position, board support and interpretation of graphite residue. Retesting without controlling these variables can create a second number without explaining the first.
Then compare the actual coating conditions: formulation, mixing and storage history, thickness, cure profile and conditioning interval. Keep samples separated by lot and location. A repeatable low result confined to one cure batch points to a different investigation from inconsistent results on adjacent tracks made with a chipped pencil.
Hold affected material for the agreed quality disposition when the requirement is not met. Any approved corrective action should be followed by verification of the relevant properties, including adhesion when applicable. Passing after additional heat does not retrospectively validate an uncontrolled rework cycle.
How Is Pencil Hardness Different from Solder Mask Adhesion?
Pencil hardness concerns resistance to local mechanical damage. Adhesion concerns the coating’s attachment to the surface beneath it. A coating can be hard yet poorly bonded, or well bonded but softer than the required pencil grade. Neither result replaces the other.
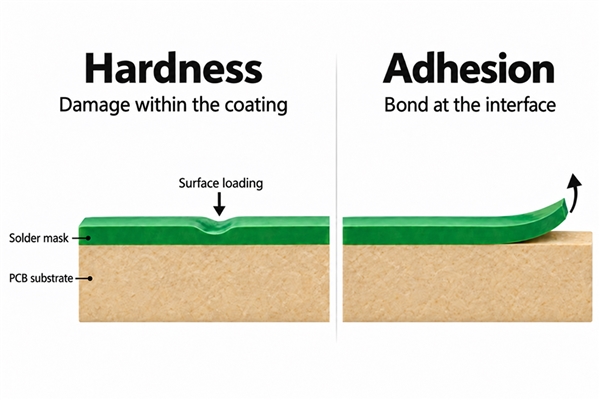
Adhesion evaluation uses its own specified preparation, tape or other test arrangement, exposure conditions and acceptance criteria. Do not call a pencil track an adhesion test, and do not apply a generic cross-cut method to a PCB without checking the governing specification. Keep the two results separate in the inspection record, even when both are requested for the same lot.
At EBest Circuit (Best Technology), our PCB testing capability includes solder mask peel-strength testing. For an order requiring a pencil hardness test as well, send the specified method, minimum grade and reporting requirements with the fabrication data to sales@bestpcbs.com. We can review the required inspection scope before confirming the order, without treating adhesion testing as proof of pencil hardness.
Pencil Hardness Test FAQs
Which pencil is softer, HB or 2B?
2B is softer than HB. Keep the grading sequence consistent and do not substitute art pencils of unknown equivalence for the specified test set.
Does 9H pencil hardness mean Mohs hardness 9?
No. Pencil grades and the Mohs mineral-hardness scale are different systems. A coating’s pencil grade cannot be converted into a mineral-hardness number.
Can a pencil hardness test for paint qualify PCB solder mask?
Not by itself. The coating chemistry, substrate, conditioning and acceptance requirements must match the PCB application. A paint-panel result does not establish compliance of a different solder mask lot.
Where should the test method come from?
Use the controlled revision required by the purchase specification and obtain standards through an authorized source. An unofficial pencil hardness test PDF or a summary of a Wolff Wilborn pencil hardness test is not a substitute for the governing document.