PCB manufacturing PCB manufacturing
Home > Blog

PCB corrosion

How to Clean Battery Corrosion Safely: Devices, Cars and PCBs
Monday, August 3rd, 2026

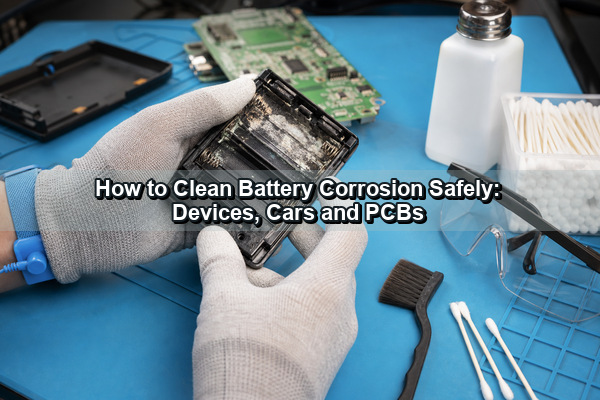
How to clean battery corrosion safely depends on the battery chemistry and where the residue has spread. White crust from an alkaline AA cell, blue-green buildup on a lead-acid car terminal and leakage from a damaged lithium-ion pack are not the same problem. This guide explains how to identify the likely source, choose the correct cleaning method, protect electronic contacts and decide when a battery holder, cable or PCB needs repair instead of more cleaning.
How to Clean Battery Corrosion Safely: Devices, Cars and PCBs

What Is Battery Corrosion?

Battery corrosion is the conductive-contact damage and residue produced when electrolyte, vapor or reaction products reach terminals, springs, cable lugs or circuit-board conductors. It can increase contact resistance, interrupt power and continue attacking copper or plated steel after the loose powder has been removed.

Color is a useful clue, but it is not a complete diagnosis. Leaking alkaline cells often leave white crystals; lead-acid terminals can develop white, blue or green deposits; copper exposed to moisture and electrolyte may turn green or dark. Identify the battery type and inspect the battery case before choosing a neutralizer.

Is Battery Corrosion Dangerous?

Yes. Leaked electrolyte can injure skin and eyes, while damaged batteries can create electrical, fire or gas hazards. Wear chemical-resistant gloves and eye protection, ventilate the work area and keep ignition sources away. Do not touch residue with bare hands or use compressed air that can spread powder into the air.

  • If alkaline electrolyte contacts skin, rinse with plenty of clean water. For eye exposure, rinse immediately and obtain medical advice; the current Panasonic alkaline-battery safety data specifies at least 15 minutes of eye rinsing.
  • Do not clean a cracked, bulging or actively leaking lead-acid battery. Replace it or have it serviced by a qualified technician.
  • Stop if a lithium-ion battery is swollen, hot, hissing, smoking, unusually odorous or leaking. Move away from the hazard and follow the manufacturer and local recycling guidance. The US EPA lithium-ion battery guidance treats swelling as damage and a potential fire risk.
  • Do not work on EV traction batteries, high-voltage storage packs or unfamiliar industrial battery systems unless you are trained and authorized.

Which Battery Chemistry Caused the Corrosion?

The cleaning agent should oppose the leaked chemistry without flooding the device. First read the battery label and determine whether the contamination is inside a small device, on a 12 V lead-acid terminal or associated with a rechargeable lithium pack.
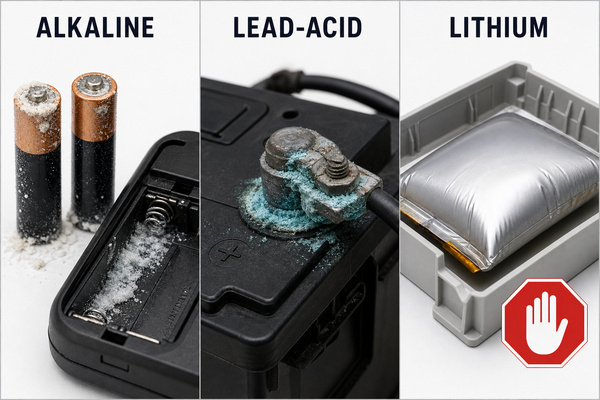
Battery corrosion chemistry guide for alkaline, lead-acid and lithium batteries
Battery situation Likely chemistry Appropriate response Do not do this
AA, AAA, C, D or 9 V alkaline cell leaked in a device Strongly alkaline electrolyte, commonly potassium hydroxide; aged white residue may include potassium carbonate Remove the cell, lift dry debris carefully, then use a small amount of diluted white vinegar or lemon juice on affected contacts Do not pour liquid into the compartment or assume the residue is battery acid
12 V car or conventional lead-acid battery terminal Acidic contamination and corrosion products around posts or cable clamps With the battery intact and safely disconnected, use baking soda and water or a commercial terminal cleaner Do not let neutralizer enter vent openings or cells
Swollen, hot, punctured or leaking lithium-ion cell or pack Damaged flammable electrolyte system Stop use, isolate the area and follow manufacturer or local hazardous-battery procedures Do not puncture, squeeze, charge, neutralize or continue using it

What Tools and Safety Gear Do You Need?

Prepare the tools before removing the battery so contaminated gloves do not spread residue around the workspace. Small electronics require precise, low-liquid tools; car terminals require insulated hand tools and a dedicated terminal brush.

  • Nitrile or other chemical-resistant gloves, safety glasses and disposable towels
  • Cotton swabs, a soft nylon brush and wooden or plastic picks for electronic compartments
  • Diluted white vinegar or lemon juice for alkaline-cell residue
  • High-purity isopropyl alcohol for the final electronics cleaning step, after neutralized residue has been removed
  • Baking soda, clean water and a battery-terminal brush for lead-acid terminals
  • A multimeter, magnifier and adequate drying time before power is restored

Avoid steel wool inside electronics because fragments can create shorts. Do not use an aggressive wire brush on thin battery contacts, plated PCB pads or component leads.

How to Clean Battery Corrosion in Small Electronics?

For toys, controllers, cameras, flashlights and similar devices, use the smallest practical amount of liquid and keep it away from switches, displays, speakers and unsealed assemblies. The objective is to neutralize alkaline residue locally, remove the reaction products and leave the compartment completely dry.

  1. Switch off the device, disconnect external power and remove every battery. Photograph battery orientation and wiring before disassembly.
  2. Place the device over a disposable work surface. Use a dry swab or plastic tool to lift loose crystals without scattering them.
  3. Lightly moisten a cotton swab with a 1:1 mixture of white vinegar and water. Apply it only to the affected metal and residue. Replace the swab as it becomes dirty.
  4. Use a soft nylon brush for stubborn deposits. Support thin springs and tabs so they are not bent or torn from the holder.
  5. Remove loosened material with a clean swab. Follow with a small amount of high-purity isopropyl alcohol to remove remaining contamination and help displace moisture.
  6. Allow the compartment to dry fully. Inspect for missing plating, cracked springs, dark copper, broken wires or residue that has traveled below the holder.
  7. Install fresh batteries only after the device is dry and the contacts are mechanically sound. Do not mix battery brands, ages or chemistries.
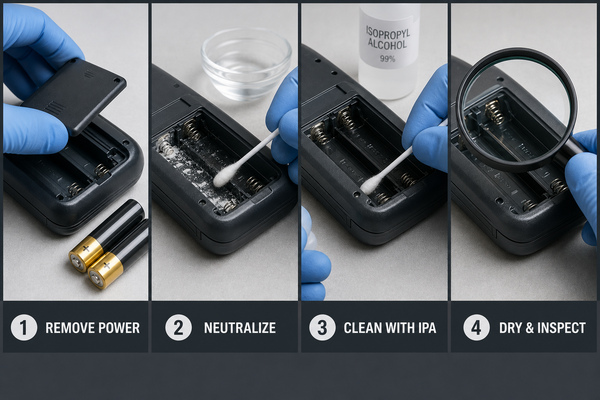
Steps for cleaning alkaline battery corrosion in small electronics

If the leaked battery is stuck, do not pry against a fragile PCB or use a metal tool that can bridge the terminals. Severe swelling, heat or an unknown rechargeable cell changes the risk; stop and use the manufacturer’s service path.

How to Clean Car Battery Corrosion?

Car battery terminal corrosion requires a lead-acid procedure, not the vinegar method used for alkaline cells in electronics. Work with the ignition off, keys removed, parking brake applied and the area ventilated. If the case is cracked, wet, swollen or leaking, replace the battery instead of cleaning it.

  1. Wear gloves and eye protection. Confirm the positive and negative terminals before loosening anything.
  2. Disconnect the negative cable first, then the positive cable. Prevent each cable from springing back onto its post.
  3. Apply a baking-soda-and-water paste or a purpose-made lead-acid terminal cleaner to the external corrosion. Keep the solution away from battery vents.
  4. After the reaction subsides, clean the post and the inside of the clamp with a battery-terminal brush. Capture residue rather than washing it onto painted metal or the ground.
  5. Wipe with a lightly dampened cloth and dry the battery top, posts and clamps completely.
  6. Reconnect the positive cable first and the negative cable last, following the vehicle maker’s torque and memory-reset instructions.
  7. Apply a terminal protectant only after the metal-to-metal connection is clean and secure.

Corrosion visible beyond the clamp can travel into copper strands under insulation. A swollen cable, stiff green conductor or recurring voltage drop may require replacement rather than surface cleaning. In equipment where the damaged lead is part of a larger assembly, the conductor gauge, terminal plating, sealing and strain relief should be reviewed before ordering a replacement custom wire harness.

How Should Battery Corrosion Be Removed from a PCB?

Once residue reaches a PCB, cleaning must be followed by electrical and structural inspection. A board can look clean while a via barrel, component lead or copper trace remains open underneath the solder mask. Disconnect all power, remove the battery holder if access is blocked and document every connector before taking the assembly apart.
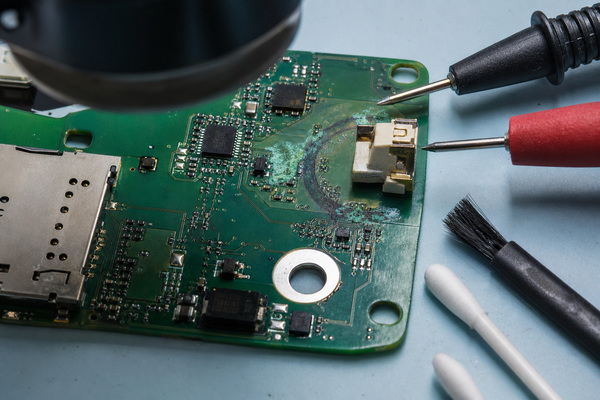
PCB inspection after battery corrosion cleaning

For confirmed alkaline residue, use a controlled amount of diluted white vinegar on the contaminated area. Remove the reacted residue, then clean with high-purity isopropyl alcohol and a soft ESD-safe brush. Do not soak relays, microphones, displays, unsealed trimmers or parts whose cleaning compatibility is unknown. Dry the assembly thoroughly before continuity or insulation checks.

Inspect exposed copper, solder joints, pads, vias and connector pins under magnification. Compare suspect traces with the schematic, measure continuity and check for unintended resistance between adjacent conductors. The related guide on how to clean a PCB board covers general flux, dust and drying methods; battery leakage adds the separate requirement to identify and neutralize the electrolyte first.

Compact cameras, controllers and portable instruments may connect the battery compartment through a flex tail. Inspect both ends of that tail and every bend; darkened conductors, delamination or corrosion at the rigid-to-flex transition normally requires replacement. A reproduced rigid-flex PCB must preserve the original bend radius, copper construction, stiffener locations and connector geometry.

If a replacement board is required, preserve the original stackup, copper weight, finish and mechanical interfaces. EBest Circuit (Best Technology) supports FR4 PCB fabrication and PCB assembly with 3D SPI, AOI, X-ray and functional testing. Published maximum capabilities remain subject to material selection, stackup, board dimensions, design complexity, quantity and engineering review.

Can a Corroded Device Still Be Repaired?

Often yes, if the contamination is confined to replaceable contacts and conductive material remains after cleaning. Repair becomes less predictable when corrosion has removed plating, entered stranded wire, lifted pads or traveled through vias and under components.

Condition after cleaning Practical action
Contact is clean, spring force is normal and continuity is stable Dry fully, install fresh batteries and function-test the device
Spring or tab is thin, cracked, loose or missing plating Replace the battery contact or complete holder
Cable copper is green or black beneath insulation Replace the affected cable or harness; surface cleaning will not restore conductor cross-section
PCB trace is open but surrounding laminate is sound Qualified repair may bridge the trace and restore protection after inspection
Multiple vias, fine-pitch pads or inner layers are affected Replace or reproduce the PCB; hidden damage can make a local repair unreliable
Lithium cell is swollen, hot or leaking Do not repair or reuse the cell; follow approved disposal and service guidance

Why Does Battery Corrosion Keep Coming Back?

Recurring corrosion usually means either residue was left in a hidden area or the underlying battery system still has a fault. In small devices, check beneath the holder, inside connector housings and along copper traces. In vehicles, inspect post seals, charging voltage, cable condition and contamination around vents.

Repeated cleaning is not a substitute for replacing a leaking cell, damaged battery, corroded holder or compromised cable. A rapid return of buildup, heat, odor, case deformation or unstable voltage requires diagnosis before the equipment is used again.

How Can Battery Corrosion Be Prevented?

Prevention focuses on storage, battery matching, mechanical integrity and early inspection. It is more effective than applying a coating over contamination.

  • Remove batteries from equipment that will not be used for several months.
  • Replace all cells in a series at the same time with the same brand, type and age.
  • Observe polarity and do not recharge a cell unless it is specifically marked rechargeable.
  • Store batteries and devices at room temperature in a dry location, away from direct heat.
  • Inspect battery compartments before long storage and after a device shows intermittent power.
  • Keep holders, gaskets and vent paths mechanically intact; trapped moisture accelerates contact damage.
  • For lead-acid terminals, keep clamps clean and secure and use an approved protectant after assembly.

FAQ About Battery Corrosion

1. Is vinegar or alcohol better for battery corrosion?

They serve different purposes. Diluted white vinegar can neutralize alkaline residue from common AA or AAA cells. High-purity isopropyl alcohol is useful after neutralization to remove remaining contamination and help displace moisture, but it does not neutralize the alkaline deposit by itself.

2. Can I use rubbing alcohol to clean battery corrosion?

Use high-purity isopropyl alcohol as a controlled final cleaning step on compatible electronic parts. Lower-concentration rubbing alcohol contains more water and additives, so it dries more slowly and may leave residue. It is not the correct neutralizer for every battery chemistry.

3. Is WD-40 good for battery corrosion?

Standard WD-40 is not a substitute for identifying and neutralizing leaked electrolyte, and its oily residue is undesirable on many PCB assemblies and battery contacts. Use a chemistry-appropriate neutralizer and an electronics-compatible, residue-controlled cleaner.

4. Can baking soda clean corrosion in an electronic battery compartment?

Not when the residue came from a typical alkaline cell. Baking soda is also alkaline and is normally used to neutralize acidic contamination around lead-acid terminals. For confirmed alkaline-cell leakage, a small amount of diluted white vinegar or lemon juice is the appropriate counteragent.

5. Can a device be powered on immediately after cleaning?

No. Remove all visible residue, allow the assembly to dry completely and inspect for damaged contacts or PCB conductors first. Powering a damp or contaminated board can create shorts, leakage current and further corrosion.

Conclusion

For a safe answer to how to clean battery corrosion, identify the battery chemistry before selecting a cleaner. Use a small amount of mild acid for alkaline-cell residue, baking soda for external lead-acid terminal contamination, and no routine DIY cleaning for a damaged lithium-ion cell. After residue is removed, inspect contacts, cables and PCB conductors instead of assuming a clean surface means the circuit is sound.

For a corroded assembly that needs PCB reproduction, component assembly or failure-oriented inspection, contact EBest Circuit (Best Technology) at sales@bestpcbs.com.

You may also like

How to Clean PCB Board Safely: Flux, Corrosion, Dust and Drying
Wednesday, July 29th, 2026

Learning how to clean PCB board safely starts with identifying the contamination. Loose dust, solder flux, oil, liquid residue and corrosion products do not respond to the same cleaning method. Before applying any liquid, disconnect every power source, discharge stored energy, establish ESD control and confirm that the solvent will not damage component bodies, labels, connectors, adhesives or conformal coating.

How to clean PCB board safely with controlled tools and inspection

What Contaminants Are Found on a PCB Board?

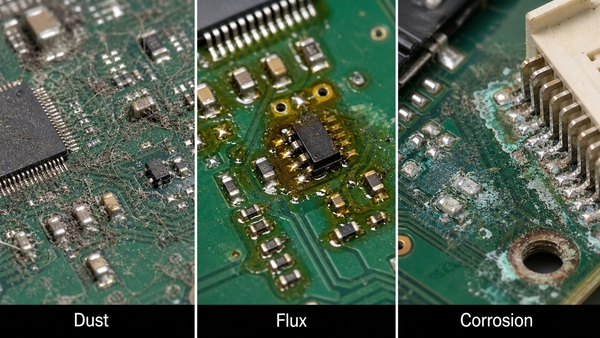
PCB contamination can be grouped by how it behaves during cleaning and how it affects the assembly. The visible color alone is not enough to select a chemical. A white film may be dried flux, cleaner residue, minerals from water or corrosion salts, and each requires a different response.

  • Loose particles: dust, fibers, metal fragments and solder balls can obstruct connectors, reduce creepage distance or create intermittent shorts.
  • Flux residue: rosin, no-clean and water-soluble fluxes contain different activators and binders. The cleaning chemistry must match the flux family.
  • Oils and nonionic soils: fingerprints, lubricants and process oils may interfere with inspection, coating adhesion or electrical contacts.
  • Ionic contamination: salts, perspiration, process chemicals and poorly rinsed cleaning agents can absorb moisture and contribute to leakage, corrosion or electrochemical migration.
  • Liquid spills: beverages, coolant, electrolyte and cleaning fluids can leave conductive or corrosive deposits after the liquid evaporates.
  • Corrosion products: green, blue, white or dark deposits may indicate chemical attack on copper, tin, nickel, component leads or plated contacts.

Cleaning can remove contamination, but it cannot restore copper that has been etched away, a lifted pad, a cracked via or a corroded component termination. Damaged conductors and components require inspection and repair after the residue is removed.

What Should You Check Before Cleaning a PCB Board?

Start by isolating the board. Unplug mains power, remove batteries and disconnect external supplies. Large capacitors and power assemblies may retain hazardous energy, so verify the discharge state with the correct instrument rather than assuming the board is safe.

Then inspect the assembly documentation and component construction. Microphones, pressure sensors, speakers, unsealed relays, displays, trimmers, switches, connectors and some electromechanical parts may trap liquid or have manufacturer-specific restrictions. Solvents can soften acrylic, polycarbonate, markings, tapes, adhesives and conformal coatings. If the board is coated, determine whether the goal is surface cleaning or intentional coating removal; those are different processes.

Use an ESD-safe workstation for sensitive electronics. Avoid ordinary household vacuums and brushes that can generate static. Photograph the board before cleaning, especially around corrosion, discolored joints and damaged parts, because cleaning may remove evidence needed for failure analysis.

Which PCB Cleaning Method Matches Each Contaminant?

The selection logic is simple: remove dry debris with a controlled dry method, dissolve chemical residue with a compatible cleaner, rinse dissolved contamination away when required, and dry every liquid-trapping area before power is restored.

Contaminant Suitable Starting Method Main Limitation
Loose dust and fibers ESD-safe soft brush, controlled clean air or electronics-safe vacuum High air pressure can damage parts or drive debris under packages
Rosin or no-clean flux Flux-compatible solvent, often high-purity IPA for small manual areas IPA does not dissolve every modern flux formulation
Water-soluble flux Validated aqueous process with deionized-water rinse Residue must be fully rinsed and the assembly thoroughly dried
Oil and grease Electronics-grade solvent verified against plastics and coatings A dissolved film must be lifted or rinsed away, not spread across the board
Salt or sugary liquid residue Controlled aqueous cleaning and deionized-water rinse when components allow Spot wiping may leave conductive residue under components
Localized corrosion deposit Gentle removal under magnification followed by compatible cleaning and inspection Cleaning does not repair lost metal or internal component damage

When the contaminant is unknown, test the cleaner on a noncritical area or a representative sample. Do not mix cleaning chemicals unless the process supplier explicitly permits it.

PCB contamination types matched with suitable cleaning methods

What Can I Use to Clean a PCB?

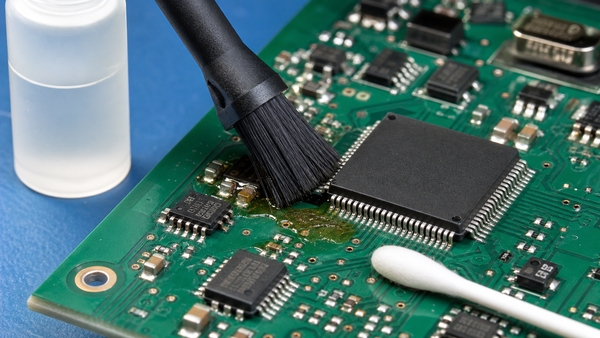
A practical manual cleaning kit contains an ESD-safe soft brush, lint-free wipes, foam or polyester swabs, clean containers, controlled low-pressure air and an electronics-grade cleaner. High-purity isopropyl alcohol is useful for many small-area jobs, but the correct product is the one that dissolves the actual residue without attacking the assembly.

Use fresh cleaner for the final pass. A dirty brush or reused solvent can redistribute dissolved flux and leave a pale film. Swabs are useful around individual joints and contacts, but cotton fibers can snag on sharp leads. For larger areas, a brush-and-rinse technique usually removes dissolved residue more effectively than repeatedly wiping with a saturated swab.

PCB cleaner sprays and flux removers should have technical data describing residue, evaporation rate, plastics compatibility and intended soils. A generic label such as “contact cleaner” is not sufficient evidence that the product is safe for the entire assembled board.

How to Clean PCB Board Step by Step?

  1. Make the assembly safe. Remove all energy sources, discharge capacitors and work in a ventilated, ESD-controlled area.
  2. Inspect and classify the contamination. Record its location, color, texture and likely source. Check whether the board has conformal coating or liquid-sensitive parts.
  3. Remove loose debris first. Use a soft ESD-safe brush, controlled air or an electronics-safe vacuum. Keep loosened particles from entering connectors and shields.
  4. Apply a compatible cleaner. Wet the brush or swab rather than flooding an unqualified assembly. Allow enough contact time for the residue to soften.
  5. Agitate gently. Brush in short controlled strokes around leads and solder joints. Do not scrape traces or force a tool beneath fine-pitch packages.
  6. Lift or rinse away dissolved soil. Blot with a lint-free material or use a validated rinse. Simply allowing dirty solvent to evaporate can redeposit contamination.
  7. Repeat with clean materials. Continue until the cleaner no longer picks up residue and the surface is free of visible film.
  8. Dry the board completely. Drain liquid from connectors, shielded areas and package gaps. Use clean dry air and a controlled drying process compatible with the components.
  9. Inspect and test. Check for corrosion damage, lifted pads, loose parts and residue before reconnecting power. Perform electrical or functional testing appropriate to the assembly.

How to Clean PCB Board with Isopropyl Alcohol?

Use electronics-grade IPA, commonly 90% or higher, for localized flux, oil and fingerprint removal when the materials are compatible. Lower-concentration rubbing alcohol contains more water and may include additives, so it evaporates more slowly and is less predictable for electronics work.

Disconnect power and provide ventilation because IPA is flammable. Apply a small amount to an ESD-safe brush or low-lint swab, agitate the residue, then lift the dissolved material with a clean wipe or a fresh-solvent rinse. Replace the swab or clean the brush once it becomes visibly contaminated.

Do not assume IPA is safe for every component. It may craze certain plastics, remove printed markings, weaken adhesives or affect coatings. It also performs poorly against some water-soluble and highly polymerized flux residues. Check the component and cleaning-agent data before treating the full board.

How to Clean Flux Off a PCB After Soldering?

Identify the flux type before choosing a process. Water-soluble organic-acid flux normally requires an aqueous wash and thorough rinse. Rosin and no-clean residues may need a matched solvent or saponifier. “No-clean” describes the residue left under a qualified process; it does not mean the residue can always remain beneath conformal coating or in a high-impedance circuit.

Clean soon after soldering or rework because heat-aged residue can become harder to dissolve. Brush the cleaner around the joint, remove the dissolved film and use fresh cleaner for the final pass. Inspect beneath leads and around component bodies where flux can collect. The detailed guide to cleaning flux off PCB covers flux-specific methods and common residue problems.

Controlled flux removal from a PCB after soldering

How Do You Remove Dust from a PCB?

Hold the powered-off board so loosened dust can leave the assembly instead of settling elsewhere. Start with a soft ESD-safe brush. Use short bursts of clean, dry, low-pressure air for spaces beneath connectors and large components, keeping the nozzle far enough away to avoid mechanical damage.

Compressed-air cans can discharge cold propellant when tilted, while plant air may contain oil or water if filtration is inadequate. Ordinary vacuums can generate static and pull on small components. If vacuum cleaning is necessary, use equipment designed for electronics with ESD control and suitable suction.

Dust combined with oil or moisture becomes an adherent film and cannot be removed reliably by air alone. In that case, move to a compatible wet-cleaning process after loose particles are removed.

How Do You Clean Corrosion from a Circuit Board?

First stop the contamination source, such as a leaking battery, electrolyte, moisture path or chemical spill. Remove loose corrosion products under magnification with a soft brush and collect the debris. Apply a cleaner selected for the known residue and board materials, then rinse or lift the dissolved material so it is not left between conductors.

Do not aggressively scrape plated pads or component leads. Once the surface is clean, inspect copper width, via barrels, solder joints, connector plating and component terminations. Measure continuity where metal loss is suspected. Severe corrosion may extend beneath solder mask or inside a component, so a visually improved surface does not prove the circuit is reliable.

For deeper fault isolation, see the existing BestPCBs article on how to clean circuit board corrosion.

How Do You Clean Circuit Board Contacts and Connectors?

Confirm the contact plating and connector construction before using a chemical. Apply a small amount of electronics-grade contact cleaner or compatible IPA to a lint-free swab, wipe in the normal contact direction and remove loosened contamination with a clean swab. Avoid flooding unsealed connectors, switches and relays.

Abrasive erasers, files and sandpaper can remove thin gold or tin plating and expose a corrosion-prone base metal. Oils and general-purpose lubricants may change contact resistance or attract dust. If a contact is pitted, worn through or mechanically loose, replacement is more reliable than repeated cleaning.

Can You Clean a PCB with Water?

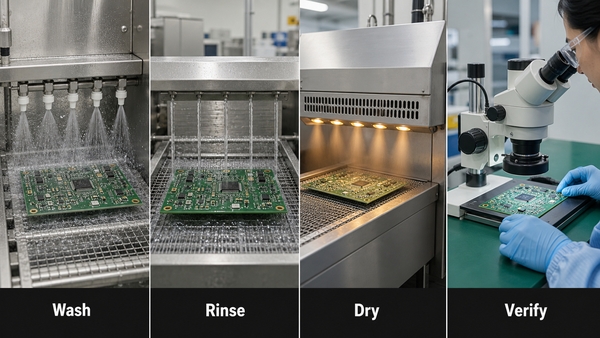
Water can be used only when the flux, components and complete cleaning process are designed for aqueous cleaning. Electronics manufacturers commonly use deionized water with controlled chemistry to remove water-soluble flux. The assembly is then rinsed with high-quality DI water and dried in a validated process.

Tap water is unsuitable because dissolved minerals and ions can remain after evaporation. Casual immersion is also unsafe for batteries, displays, microphones, speakers, unsealed transformers, relays, switches and liquid-trapping connectors. If an assembled board was exposed to a conductive spill, a properly controlled aqueous wash may be necessary, but it must be followed by complete rinsing, drying and inspection.

Is It Safe to Use WD-40, Vinegar, or Household Cleaners on a PCB?

Do not use standard WD-40 as a general PCB cleaner. Its lubricating film can attract dust, interfere with coating or contact behavior and complicate later repair. A product specifically formulated and documented as an electronics contact cleaner is a different material and still requires compatibility review.

Vinegar is acidic. It may dissolve some alkaline corrosion deposits, but it can also attack metals and must be fully neutralized or rinsed. It is not a universal circuit-board cleaner. Household glass cleaners, dish detergents and multipurpose sprays may contain water, salts, fragrance, surfactants or ammonia that leave residue or damage materials.

Acetone, paint thinner and strong alkaline cleaners can attack solder mask, plastics, labels and adhesives. Use a cleaner with documented electronics compatibility instead of choosing a chemical only because it dissolves visible dirt.

How Should a PCB Be Dried After Cleaning?

Drain the board in more than one orientation so liquid can leave connectors, shield cans, vias and package gaps. Blow with clean, dry, low-pressure air, then allow sufficient time or use controlled warm-air drying within the lowest temperature limit of the assembly. Do not aim an uncontrolled household hair dryer at the board; heat, static and airborne contamination are difficult to control.

Drying time cannot be reduced to one universal number. It depends on the cleaner, board size, component spacing, connector geometry, humidity, air movement and temperature. A surface that feels dry may still contain liquid beneath a BGA, shield or connector. Critical assemblies should use a documented drying cycle and moisture verification rather than a visual guess.

How Are PCBs Cleaned in Manufacturing?

Production cleaning is selected from the flux chemistry, board density, component restrictions, cleanliness limit and throughput. Common processes include manual solvent cleaning for localized rework, spray-in-air or batch aqueous cleaning, semi-aqueous cleaning, vapor-phase solvent cleaning and carefully qualified ultrasonic systems.

Process Typical Use Control Point
Manual solvent cleaning Localized repair and low-volume assemblies Operator method, solvent loading and residue removal
Aqueous spray cleaning Water-soluble flux and compatible assemblies Chemistry concentration, wash temperature, impingement, rinse quality and drying
Semi-aqueous cleaning Heavy organic residue requiring solvent action and water rinse Material compatibility and complete rinse
Vapor cleaning Qualified solvent-removable soils and complex geometry Solvent selection, emissions controls and component compatibility
Ultrasonic cleaning Selected robust assemblies with difficult access Frequency, power, fixture, chemistry and restrictions for sensitive components

Ultrasonic cleaning is not automatically safe for every assembled PCB. Crystals, MEMS devices, wire bonds, microphones and mechanically sensitive parts may have restrictions. The process must be qualified on the actual assembly rather than chosen only because it reaches under components.

EBest Circuit (Best Technology) supports PCB assembly with process planning, inspection and testing appropriate to the assembly design. Cleaning requirements should be defined before production when the product uses water-soluble flux, conformal coating, high-impedance circuits or reliability-sensitive applications.

Manufacturing PCB cleaning and cleanliness verification process

How Do You Verify That a PCB Is Clean?

Start with magnified visual inspection under repeatable lighting. Look for glossy or white films, trapped fibers, residue around leads, corrosion, displaced components and incomplete drying. UV inspection can reveal some fluorescent flux residues, but not all contamination fluoresces.

For controlled manufacturing, visual appearance is only one criterion. Resistivity of solvent extract testing provides a broad ionic-contamination screen. Ion chromatography identifies and measures specific ionic species. Surface insulation resistance testing evaluates leakage behavior under temperature, humidity and electrical bias. Process coupons can help demonstrate that a cleaning process remains stable.

Finish with the electrical tests appropriate to the board: continuity, insulation resistance, in-circuit test or functional test. A clean-looking board can still contain an open circuit, a short, a damaged component or residue hidden under a package.

FAQ About Cleaning PCB Boards

Is it safe to clean PCB with alcohol?

High-purity electronics-grade IPA is safe for many PCB surfaces when power is removed and the materials are compatible. Check plastics, coatings, labels and liquid-sensitive components before full-board use.

What liquid is used to clean PCB boards?

Common choices include electronics-grade IPA, flux-specific solvents and controlled aqueous chemistry with DI-water rinsing. The correct liquid depends on the contaminant and assembly materials.

How do you clean a circuit board without alcohol?

Use a dry ESD-safe brush or controlled air for loose dust. For chemical residue, select a documented non-IPA electronics cleaner or a qualified aqueous process rather than substituting an unverified household chemical.

Can I use a PCB cleaner spray?

Yes, if its technical data confirms suitability for the residue and compatibility with plastics, coatings and components. Control overspray and remove the dissolved soil instead of allowing it to dry elsewhere.

Can I clean a PCB with vinegar?

Vinegar is not suitable for general PCB cleaning. It may be used only in a controlled, localized corrosion treatment with full understanding of the residue and a complete follow-up rinse.

Can I use an ultrasonic PCB cleaning machine?

Only after the complete assembly is qualified for the chemistry, frequency, power and exposure. Sensitive mechanical, acoustic and MEMS components may be damaged.

Conclusion

The safest way to learn how to clean PCB board is to match the method to the contaminant. Remove dry debris without generating static, use compatible chemistry for flux or oil, reserve water for validated aqueous processes, dry trapped areas completely and verify both cleanliness and electrical function.

For PCB fabrication or PCBA process support, contact EBest Circuit (Best Technology) at sales@bestpcbs.com.
You may also like