A PCB relay helps a low-power control circuit switch a separate load circuit on a printed circuit board. It is widely used in industrial controls, home appliances, power modules, automotive electronics, security devices and automation boards. To use it safely, engineers must check coil voltage, contact rating, pinout, footprint, relay PCB layout, circuit protection, soldering quality and load conditions before prototype or mass production.
What Is a PCB Relay?
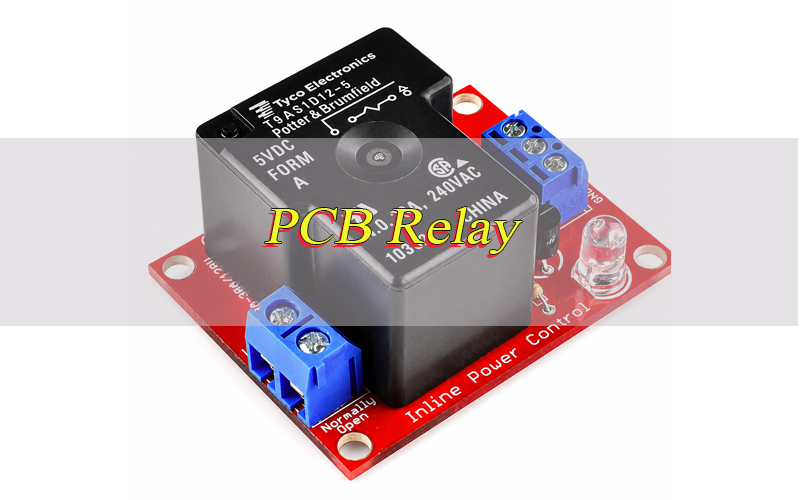
A PCB relay is a relay designed to be mounted directly on a printed circuit board. It allows a low-power signal to control a separate load circuit through isolated switching contacts. The relay usually has coil pins for the control side and contact pins for the load side.
Most board-mounted relays use through-hole pins because they provide stronger mechanical support and better current handling. Some compact signal relays may use surface-mount packages. In a relay control board, the component, footprint, copper width, solder joints and protection circuit all affect long-term reliability.
What Does a PCB Relay Do?
A PCB relay switches electrical loads on or off from a board-level control signal. Its main function is to separate the control circuit from the load circuit while allowing safe switching. This helps a microcontroller, sensor or logic IC control higher-voltage or higher-current devices.
The main functions include:
- Switching AC or DC loads from a PCB.
- Isolating low-voltage logic from higher-power circuits.
- Controlling motors, lamps, heaters, fans, pumps and valves.
- Supporting normally open, normally closed or changeover switching.
- Reducing direct electrical stress on control components.
Therefore, this component is useful when isolation, simple control and reliable load switching are more important than high-speed switching.
How Does a PCB Relay Work?
A PCB relay works through a coil, armature and contact system. When the coil receives the correct voltage, it creates a magnetic field that moves the armature and changes the contact state. The contacts then open or close the load circuit.
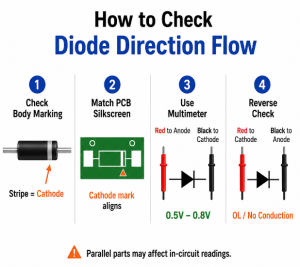
When coil power is removed, a spring returns the armature to its original position. The load side and control side remain electrically separated. Because the coil is an inductive load, the circuit should include protection such as a flyback diode, TVS diode or snubber to reduce voltage spikes and protect the driver circuit.
Where Are PCB Relays Used?
PCB relays are used in products that require board-level control of external loads. They are common in industrial equipment, appliances, automotive electronics, power control boards and smart devices. The actual application depends on load type, current rating, voltage level, safety spacing and operating environment.
Common applications include:
- Industrial automation controllers.
- HVAC control boards.
- Home appliance control modules.
- Power supply and battery management boards.
- Security alarm and access control systems.
- Automotive auxiliary control circuits.
- Test instruments and signal switching devices.
- Smart home and IoT control products.
In these applications, the relay must match both the electrical load and the PCB manufacturing process.
What Are Types of PCB Relay?
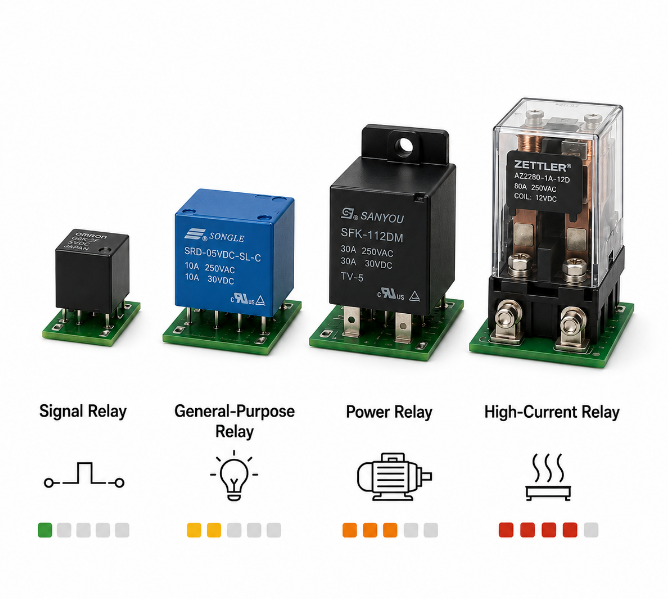
PCB relay types can be classified by switching load capacity. This method is practical for PCB design because load capacity directly affects contact rating, copper width, pad size, heat rise, footprint area and relay cost. It also helps engineers decide whether the board needs a simple signal switch, a medium-load control part or a stronger power switching solution.
| Type | Load Level | Typical Use |
|---|---|---|
| Signal relay | Low current | Signal routing, test instruments, communication boards |
| General-purpose relay | Low to medium current | Control boards, small appliances, automation modules |
| Power relay | Medium to high current | Motors, fans, lamps, heaters, pumps |
| High-current relay | High current | Power boards, battery systems, industrial equipment |
For real projects, the load type matters as much as the current value. A 5A resistive load is easier to switch than a 5A motor, solenoid or lamp load because inductive and inrush loads create stronger contact stress. Therefore, the relay should be selected according to actual load behavior, not only the rated current printed on the datasheet.
How Do You Choose the Right PCB Relay?
Choose a PCB relay by checking the load first, then the coil, footprint, protection design and supply risk. The right relay should match the real operating condition, fit the PCB layout and remain stable for future production. A part that works in a prototype may still fail in mass production if the footprint, derating, sourcing or test method is not reviewed.
- Check coil voltage.
Match the coil to the control supply, such as 5V, 12V or 24V. Wrong coil voltage can cause no action, buzzing, overheating or unstable switching. Also check pull-in voltage and release voltage, because a relay may not switch reliably if the power supply drops during operation. - Check contact rating.
Confirm the rated voltage and current for the exact load type. AC and DC ratings are different, and DC loads usually need more margin because DC arcs are harder to break. For safety, the real load current should not be placed at the relay’s maximum limit. - Check load behavior.
Motors, lamps, solenoids, valves and transformers can create inrush current or voltage spikes. These loads need higher contact margin and protection parts. If the load starts with a surge current, select the relay based on surge behavior, not only steady-state current. - Check contact form.
Use NO when the load should turn on after energizing. Use NC when the load should stay on by default. Use SPDT or DPDT when one control signal must switch between two paths. Choosing the wrong contact form can make the device work opposite to the intended logic. - Check the PCB relay footprint.
Confirm pin pitch, hole size, pad diameter, body outline and pin direction. Same pin count does not mean the same PCB footprint. Before fabrication, compare the datasheet view with the PCB library footprint to avoid reversed pinout or poor assembly fit. - Check coil drive current.
If the coil current is higher than the MCU output rating, use a transistor, MOSFET, optocoupler or relay driver IC. The driver should have enough current margin, and the coil side should include suppression to protect the control circuit. - Check insulation spacing.
High-voltage and high-current load copper should be separated from logic copper. Creepage and clearance must match the product safety requirement. For mains or high-voltage circuits, wider spacing, isolation slots or layout barriers may be required. - Check environment.
Temperature, vibration, humidity and dust affect relay life. Industrial or automotive products may need better mechanical strength, heat resistance and vibration tolerance. If the product works outdoors or near motors, environmental stress should be reviewed early. - Check sourcing risk.
Before mass production, confirm brand availability, approved alternates, lead time, certification and long-term supply stability. A relay with no second source may create production delays if the part becomes short or discontinued.
How Do You Read a PCB Relay Pinout?
A PCB relay pinout shows how the relay pins connect to the PCB pads. The coil pins belong to the control side, while COM, NO and NC pins belong to the switching side. The PCB relay symbol explains the circuit function, and the footprint defines the real pad, hole and pin spacing.
| Mark | Meaning | Function |
|---|---|---|
| Coil | Control terminals | Energizes relay |
| COM | Common contact | Main switching point |
| NO | Normally open | Closes when energized |
| NC | Normally closed | Opens when energized |
| SPST | Single pole single throw | On/off control |
| SPDT | Single pole double throw | Changeover control |
| DPDT | Double pole double throw | Two changeover paths |
Always compare the datasheet top view or bottom view with the PCB footprint. A reversed pinout can make the circuit fail even when the schematic looks correct.
What Should Be Checked in a PCB Relay Circuit Design?
A PCB relay circuit design should be checked from both electrical and manufacturing angles. The most important items are coil drive capacity, contact rating, protection parts, trace width, creepage, clearance, soldering pads and load isolation. These points determine whether the relay can switch safely in real use.
| Area | Check | Risk |
|---|---|---|
| Coil drive | Transistor, MOSFET, driver IC | MCU damage |
| Protection | Diode, TVS, snubber | Voltage spike |
| Contact path | Copper width, current | Heat rise |
| Isolation | Clearance, creepage | Short circuit |
| Load type | Motor, lamp, heater | Contact arcing |
| Pad design | Hole, annular ring | Weak solder joint |
| Test access | Coil and contact nets | Hard debugging |
| Thermal design | Copper balance | Soldering defect |
For high-current or mains circuits, the layout must support the relay safety rating with proper copper spacing and insulation design.
How to Wire a PCB Relay Safely?
Wire a PCB relay by keeping the control side and load side separate. The coil connects to the driver circuit, while COM, NO and NC connect to the load path. The main goal is to prevent the load voltage or load current from entering the low-voltage control circuit.
1. Read the datasheet pinout.
Identify coil pins, COM, NO and NC before wiring. Check whether the drawing is top view or bottom view. This step prevents reversed footprint errors, which are common when the relay package looks symmetrical.
2. Connect the coil to a driver.
Do not drive most relay coils directly from an MCU pin. Use a transistor, MOSFET or relay driver IC when coil current is high. The MCU should only provide the control signal, while the driver carries the coil current.
3. Add coil protection.
For a DC coil, place a flyback diode, TVS diode or other suppression part near the coil. This protects the driver when the relay turns off. If fast release time is important, a TVS diode or diode plus Zener design may be better than a simple diode.
4. Wire the load through COM and NO or NC.
Use COM-NO for a load that turns on after energizing. Use COM-NC for a load that turns off after energizing. Label the contact function clearly in the schematic to reduce wiring mistakes during assembly and repair.
5. Separate high-power and low-power copper.
Keep load traces away from MCU, sensor, communication and low-voltage signal traces. This reduces noise coupling, short-circuit risk and safety spacing problems.
6. Size the copper path correctly.
The relay contact, PCB trace, solder joint and connector must all carry the load current safely. If any part of the path is undersized, the board may overheat even when the relay itself is correctly rated.
7. Add load-side protection when needed.
Motors, valves and solenoids may need snubbers, varistors, TVS devices or fuses. Protection should match the load type and voltage level. Without protection, relay contacts can arc, pit or weld.
8. Test before full power.
Check coil voltage, contact state, load polarity, fuse position and protection parts with a current-limited supply first. After the basic test passes, increase to the real load condition and monitor temperature rise.
What Common Precautions Should Be Followed When Using PCB Relays?
PCB relays common precautions should prevent coil damage, contact arcing, unsafe spacing and weak solder joints. A relay click does not prove the circuit is safe. The rating, layout, soldering quality and test result must all be checked. This is especially important for high-current, mains, motor and outdoor control products.
- Do not exceed contact rating.
Overload can cause contact welding, arcing, overheating and early failure. Always check the rating under the same load type, such as resistive, inductive, motor or lamp load. - Do not use the wrong coil voltage.
Low voltage may cause buzzing or incomplete switching. High voltage may overheat the coil. Check actual coil voltage during operation, not only on the schematic. - Protect inductive loads.
Motors, solenoids and transformers should use snubbers, varistors or TVS devices when required. This reduces contact arcing and extends electrical life. - Keep enough spacing.
High-voltage load copper should not be close to low-voltage logic copper. Use wider spacing, isolation slots or separate copper areas when the product involves mains or high-voltage switching. - Avoid weak solder joints.
Relay pins carry current and mechanical stress. Check hole size, pad size, hole fill and annular ring. Poor solder joints can cause intermittent switching, heat marks or field failure. - Control heat.
Keep the relay away from hot power parts when possible. Check temperature rise under real load, especially when the board is enclosed or has poor airflow. - Follow soldering limits.
Relay bodies, seals and pins may have soldering and cleaning limits. Do not wash the board unless the relay supports the cleaning process. Cleaning fluid inside an unsuitable relay can affect contact reliability. - Avoid routing sensitive signals under the load path.
Relay load traces may carry surge current and switching noise. Keep them away from analog signals, RF lines, reset lines and communication buses. - Add test access.
Provide test points for coil voltage, driver signal and load path if the board needs debugging or production testing. This makes failure analysis faster and reduces repair time.
How to Mount Relay on PCB?
Mount relay on PCB by checking footprint accuracy, insertion fit and solder joint quality. A relay should sit flat on the board without forced pin bending. Poor mounting can create weak solder joints, cracked holes, tilted parts and unstable contact during vibration.
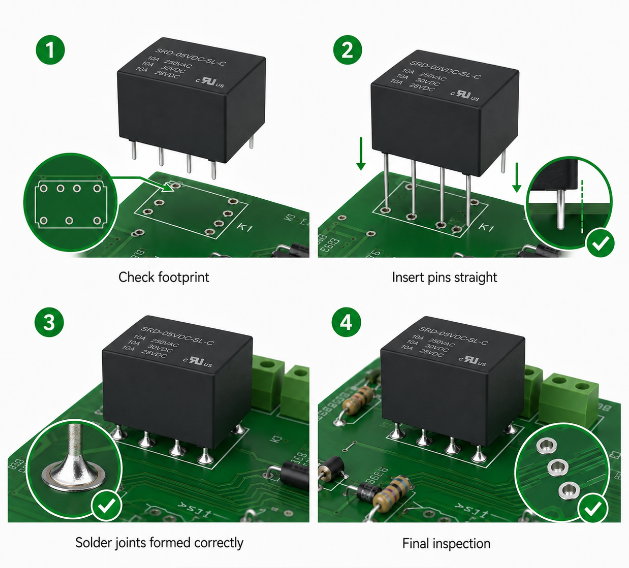
1. Confirm the footprint.
Check pin pitch, hole size, pad size, relay outline, keep-out area and pin direction against the datasheet. Pay attention to top-view and bottom-view differences before PCB fabrication.
2. Check mechanical clearance.
Leave enough space around the relay body for insertion, soldering, inspection and heat dissipation. If a connector or enclosure is nearby, confirm the relay height and body outline.
3. Insert the relay gently.
The pins should enter the holes smoothly. Forced insertion can damage pins, plating or the relay body. If insertion is difficult, check the hole size and pin alignment instead of pressing harder.
4. Keep the relay flat.
A tilted relay creates uneven solder joints and weaker mechanical support. For larger relays, flat seating also helps reduce vibration stress on the pins.
5. Use the correct soldering method.
Through-hole relays are usually wave soldered or hand soldered. Control soldering temperature and dwell time. Excessive heat can damage the relay body or affect internal parts.
6. Avoid unsafe cleaning.
Flux-proof and sealed relays are not the same. Cleaning fluid can enter unsuitable relays and affect contact reliability. Confirm the relay sealing level before any washing or coating process.
7. Inspect after soldering.
Check hole fill, wetting, cracks, bridges, lifted pads and relay alignment. For high-current pins, solder quality is critical because poor joints can create heat and voltage drop.
8. Run a basic electrical check.
Confirm coil continuity, contact state and no short between control copper and load copper. This check should be completed before the board enters functional testing.
How to Test a PCB Relay?
Test a PCB relay by checking the coil, contact action, driver circuit and load path. Testing should confirm both relay movement and real electrical switching. A relay that clicks may still have burned contacts, wrong wiring or a failed load path.
1. Disconnect power.
Turn off the board and discharge capacitors before measuring. This protects the technician, meter and PCB from accidental short circuits.
2. Identify pins.
Use the datasheet to locate the coil, COM, NO and NC pins. Do not guess by package shape because similar relays may use different pinouts.
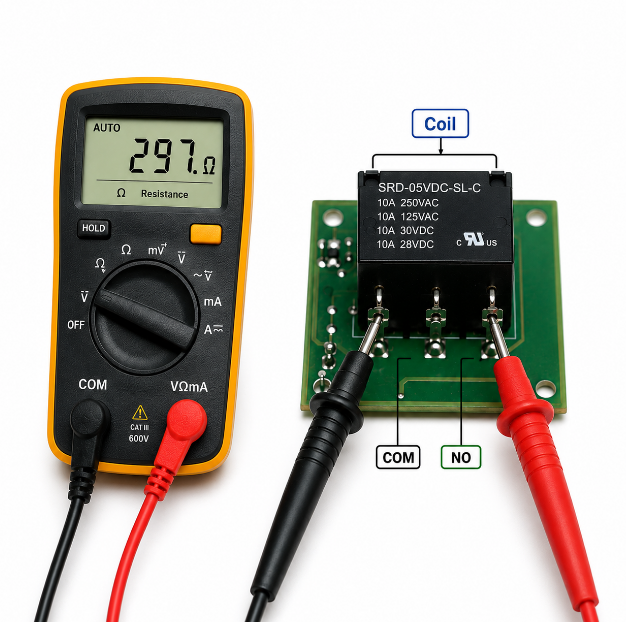
3. Measure coil resistance.
Use a multimeter to check the coil. An open reading may mean a broken coil. A very low reading may mean a shorted coil. Compare the result with the datasheet range when available.
4. Apply rated coil voltage.
Use a current-limited supply. The relay should switch clearly without buzzing or overheating. If it buzzes, check supply voltage, driver current and coil rating.
5. Check contact continuity.
Measure COM-NO and COM-NC before and after energizing the coil. The contact state should change correctly. If the state does not change, the contact system may be damaged or the wrong pins may be tested.
6. Check the driver circuit.
If the relay does not work on the board, test the transistor, MOSFET, diode, control signal and coil supply. Many relay failures are actually caused by a failed driver or missing control voltage.
7. Check the load path.
Measure voltage at the load input and output side. If the relay clicks but the load does not work, the issue may be a fuse, connector, trace, solder joint or burned contact.
8. Test with the real load safely.
Confirm stable switching, no abnormal heat, no contact sticking and no voltage drop on the load path. For motors or inductive loads, repeat switching cycles to check contact stress.
What Are Common PCB Relay Problems and Failure Signs?
Common PCB relay problems are usually caused by wrong selection, poor protection, weak soldering or overload. The relay should be checked together with the driver circuit, load path and PCB copper. Replacing only the relay without correcting the root cause can lead to repeated failures.
- No click when powered.
Possible causes: wrong coil voltage, open coil, failed driver, broken trace or missing control signal.
Prevention: verify coil voltage, driver current and control signal during prototype testing and production inspection. - Clicking but no load output.
Possible causes: wrong COM/NO/NC wiring, burned contacts, no load supply, blown fuse or cracked solder joint.
Prevention: check contact continuity, load voltage and fuse status during functional testing. - Contact sticking.
Possible causes: overload, high inrush current, inductive surge or undersized contact rating.
Prevention: choose higher contact margin, add surge protection and avoid switching loads beyond the rated category. - Relay buzzing.
Possible causes: low coil voltage, unstable supply, weak driver current or wrong coil type.
Prevention: measure coil voltage during actual switching and keep enough power supply current margin. - Overheating.
Possible causes: high current, narrow PCB traces, weak solder joints, poor connector design or nearby hot components.
Prevention: review trace width, solder quality, connector rating, airflow and temperature rise under real load. - Intermittent switching.
Possible causes: cracked solder joints, vibration, oxidized contacts or unstable coil drive.
Prevention: improve pad design, inspect solder joints, secure heavy components and select a relay suitable for the environment. - Burned pads or traces.
Possible causes: excessive current, arcing, poor copper width or loose load connection.
Prevention: calculate current path, check connector rating, add protection and test under the real load before mass production. - Short relay life.
Possible causes: frequent switching, inductive load, high inrush current, heat or wrong relay category.
Prevention: confirm electrical life under real load conditions and choose a relay with enough switching-cycle margin.
How to Remove Relay from PCB Board?
Remove relay from PCB board only after the solder is fully cleared from every pin. Pulling the relay by force can lift pads, damage plated holes and break copper traces. Careful removal is important because relay pins are often larger and harder to desolder than small signal components.
1. Disconnect all power.
Remove external power, load wiring and stored energy from capacitors. If the board controls AC or high-current loads, confirm the circuit is fully isolated before handling.
2. Mark the relay direction.
Take a photo before removal so the replacement part is installed correctly. This helps prevent reversed installation, especially when the pin layout is not symmetrical.
3. Add flux or fresh solder.
This improves heat transfer and makes old solder easier to remove. Old solder can be difficult to clear if the board has large copper areas connected to the relay pins.
4. Desolder each pin.
Use a desoldering pump, braid or vacuum desoldering tool. Work slowly on every through-hole pin. Avoid heating one pad for too long because excessive heat can lift copper pads.
5. Check pin movement.
Gently move each pin. If one pin is still fixed, continue desoldering instead of pulling. A single stuck pin can tear the through-hole plating.
6. Lift the relay carefully.
Remove the relay only when all pins are loose. If the relay still resists movement, recheck solder in the holes before applying force.
7. Inspect the PCB.
Check pads, holes and nearby traces. Repair damaged copper before installing a new relay. After replacement, test continuity and confirm the correct contact state.
How Much Does a PCB Relay Cost?
PCB relay price depends on rating, structure, certification, brand, quantity and supply condition. The real cost also includes PCB space, copper width, protection parts, assembly and testing. For OEM projects, choosing the wrong relay can cost more than the relay itself because it may cause redesign, delay or field failure.
- Contact rating.
Higher current and voltage ratings usually cost more because they require stronger contacts and wider internal spacing.
Prevention: choose enough margin for safety, but avoid oversized parts that waste space and cost. - Coil voltage.
Common voltages such as 5V, 12V and 24V are easier to source. Uncommon voltages may increase lead time and limit substitute options.
Prevention: use standard coil voltages when the system design allows it. - Load type.
Inductive or high-inrush loads may need a stronger relay and extra protection parts.
Prevention: define the real load type before choosing the relay, especially for motors, lamps, valves and solenoids. - Certification.
Safety-approved parts may cost more but reduce compliance risk for export products.
Prevention: confirm UL, RoHS or customer-specific requirements before BOM approval. - Brand and availability.
Major brands may cost more, but they often provide better datasheets, stable quality and clearer replacement options.
Prevention: approve alternate parts early to reduce shortage risk. - Assembly method.
Through-hole relays may require extra assembly time compared with small SMT components.
Prevention: consider assembly process, soldering method and inspection requirements during quotation. - Testing requirement.
Functional switching tests, insulation tests and load simulation add cost but reduce field failure.
Prevention: define practical test requirements based on product risk and load condition. - PCB layout impact.
Larger relays need more board space, wider copper and larger safety clearance.
Prevention: review relay size, copper path, connector position and keep-out area during early layout.
FAQs About PCB Relay
Q1: Will PCB relay fit breadboard?
A1: Most PCB relay parts do not fit a breadboard directly because the pins may be thicker, shorter or spaced differently from standard breadboard holes. Use a relay module, adapter PCB or socket for simple bench testing. Breadboards should not be used for high-current or mains-load switching.
Q2: What is the difference between PCB relay 5V and PCB relay 12V?
A2: The difference is coil voltage. A PCB relay 5V coil uses a 5V drive supply, while a PCB relay 12V coil uses a 12V drive supply. Contact rating may be the same or different. Always check coil current, pull-in voltage and release voltage before replacement.
Q3: Can a microcontroller drive a relay directly?
A3: Usually not. A relay coil often draws more current than an MCU pin can safely supply. Use a transistor, MOSFET, optocoupler or relay driver IC. For DC coils, add a flyback diode or another suppression part to protect the control circuit.
Q4: Why does a relay need a diode?
A4: A DC relay coil creates a voltage spike when it turns off. A flyback diode gives the coil current a safe discharge path and protects the driver device. If fast release is required, use a TVS diode or diode plus Zener design.
Q5: Why does a relay click but not switch the load?
A5: A click only proves that the coil may be moving. The load can still fail because of wrong COM/NO/NC wiring, burned contacts, no load supply, a blown fuse or a cracked solder joint. Check contact continuity and load voltage before replacing the relay.
Q6: Can a PCB relay switch both AC and DC loads?
A6: Some relays can switch both AC and DC loads, but the ratings are different. DC loads are harder to switch because the arc does not naturally cross zero. Always use the datasheet rating for the exact voltage, current and load type.
Q7: What is NO and NC on a relay?
A7: NO means normally open, and NC means normally closed. NO closes when the coil is energized. NC opens when the coil is energized. COM is the shared switching terminal. Choosing the wrong contact can make the circuit work opposite to the intended logic.
Q8: Why does a relay buzz on a PCB?
A8: Relay buzzing often comes from low coil voltage, unstable power, weak driver current, wrong coil type or AC ripple. Measure coil voltage during actual switching. If the voltage drops below the holding range, the relay may vibrate and switch unstably.
Q9: Can conformal coating be applied over relays?
A9: It depends on the relay sealing type. Coating can enter unsealed relays and affect contacts or movement. Use sealed relays or define coating keep-out areas. Confirm coating material, viscosity, curing temperature and relay sealing level before production.
Q10: How do you know if a relay footprint is wrong?
A10: A wrong footprint may cause pin mismatch, reversed contacts, tilted mounting, poor insertion or unsafe spacing. Compare the datasheet view with the PCB library footprint before fabrication. Check pin pitch, hole size, pad diameter and relay outline.
Q11: Can a relay be replaced with a different brand?
A11: Yes, but only when coil voltage, contact rating, pinout, footprint, insulation rating, temperature range and certification match. The same body size does not guarantee compatibility. Test the alternate part in the real circuit before mass production.
Q12: How long can a PCB relay last?
A12: Relay life depends on electrical load, switching frequency, contact material, temperature and protection design. Mechanical life is usually higher than electrical life because real load switching wears the contacts. Inductive loads and high inrush current reduce service life.
Q13: What should buyers provide for a relay PCB project?
A13: Buyers should provide the relay part number, coil voltage, load voltage, load current, AC/DC type, operating temperature, certification needs, order quantity and test requirements. Gerber files, BOM, schematic and functional test method help reduce errors.
Q14: Can EBest Circuit support relay PCB assembly?
A14: Yes. EBest Circuit supports relay PCB fabrication, component sourcing, through-hole assembly, SMT assembly, solder joint inspection and functional switching tests. As a China source PCB/PCBA manufacturer with global supply capability, we help review footprint, copper width, sourcing risk and assembly quality before production.
A reliable PCB relay design should match coil voltage, contact rating, load type, footprint, copper width, insulation spacing and protection parts. A well-reviewed design reduces unstable switching, contact damage, overheating, assembly defects and redesign risk.
For purchasing, confirm the part number, certification, quantity, lead time, approved alternates and test requirements before mass production. EBest Circuit supports PCB relay component sourcing, assembly and functional testing for global OEM and ODM projects. Send your drawings, BOM and project requirements to sales@bestpcbs.com for a fast quotation.