If you work with electronic circuits, you’ve likely encountered components that group multiple resistors together. Do you know what a resistor network is, how to calauate it? A resistor network is a key component in many electronic devices, from simple consumer gadgets to complex industrial systems. This guide covers the basics of resistor networks, including their definition, types, uses, calculations and troubleshooting.

What is a Resistor Network?
A resistor network is an assembly of multiple resistors connected in a specific configuration series, parallel, or a combination of both to perform a dedicated electrical function. Unlike individual resistors, which act alone, a resistor network integrates multiple resistive elements into a single, compact package.
This integration simplifies circuit design, reduces board space, and ensures consistent performance across all resistors in the network. Resistor networks are designed to handle specific voltage, current, and resistance requirements, making them versatile for a wide range of applications.
They can be surface mount or through-hole, and their resistance values are calibrated to work together seamlessly, eliminating the need to source and test individual resistors separately.
What Are Types of Resistor Network?
Resistor networks are categorized by their internal connection configuration, package type, and intended use. The most common types include:
- Series Resistor Network: Resistors are connected end-to-end, so the same current flows through each resistor. Total resistance equals the sum of all individual resistances. This type is used for voltage division and current limiting in circuits where consistent current flow is critical.
- Parallel Resistor Network: Resistors are connected across the same two nodes, so the same voltage is applied to each resistor. Total resistance is lower than the smallest individual resistor, and current divides evenly among the resistors. This type is ideal for reducing overall resistance and handling higher current loads.
- Mixed Resistor Network: Combines series and parallel connections to achieve specific resistance values and current/voltage characteristics. This is the most common type, used in complex circuits like amplifiers, filters, and power supplies.
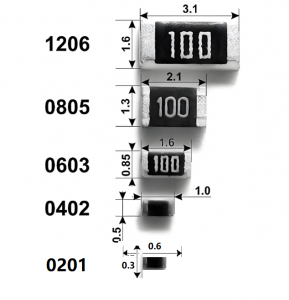
- Surface Mount Resistor Network: Packaged in small, flat designs for surface mount technology PCBs. These networks are compact, lightweight, and ideal for high-density circuits in smartphones, laptops, and other portable devices.
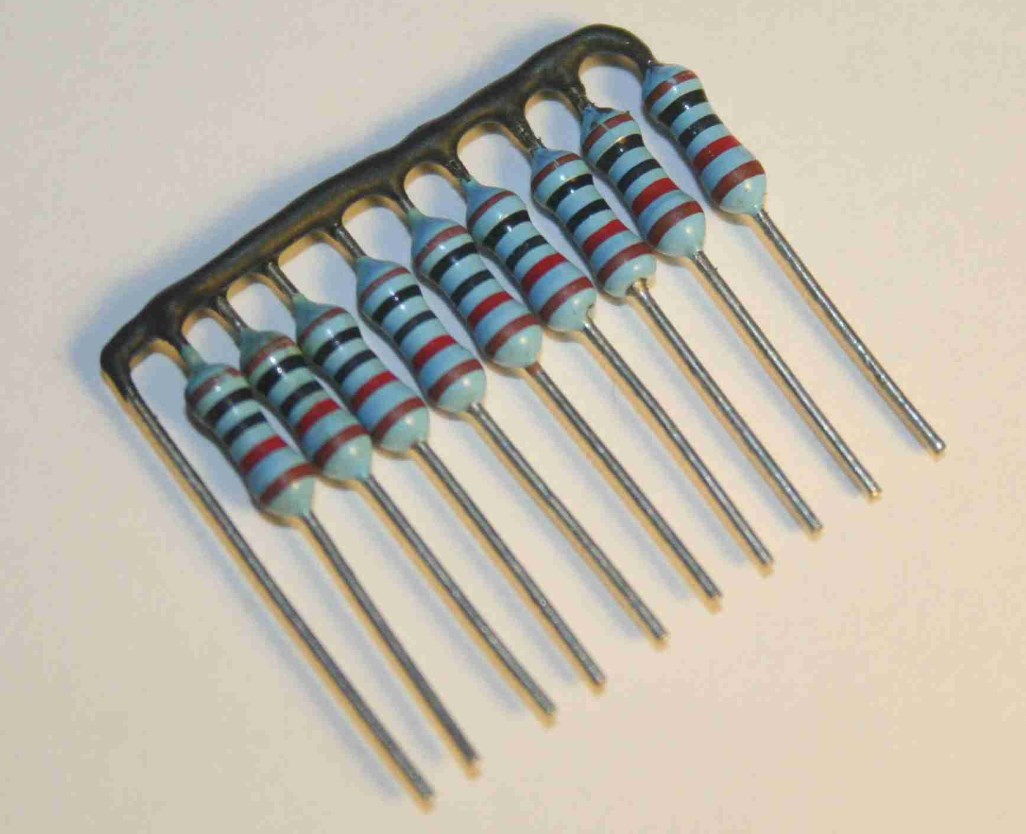
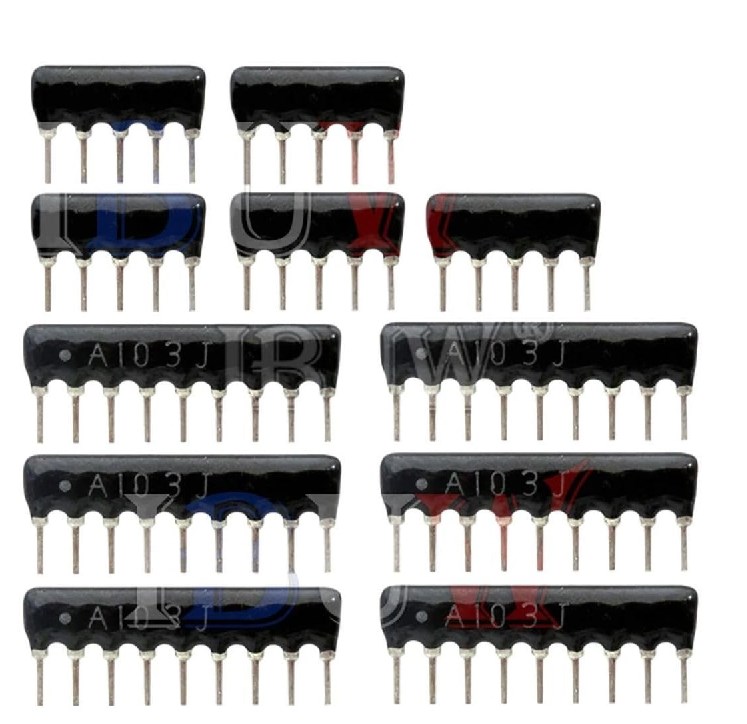
- Through-Hole Resistor Network: Features long leads that insert into PCB holes, making them suitable for rugged applications and manual assembly. Common in industrial equipment and legacy electronics.
What Are Symbols for Resistor Network?
| Resistor Network Type | Symbol Representation (IEC/ANSI) | Legend & Explanation |
| Series Resistor Network | IEC: ▭-▭-▭ (3 resistors in series) ANSI: ∿-∿-∿ (3 resistors in series) | ▭ (IEC resistor symbol), ∿ (ANSI resistor symbol); hyphens (-) indicate end-to-end series connection. Only 1 input and 1 output terminal, current flows sequentially. |
| Parallel Resistor Network | IEC: ┬▭┬ ├▭┤ ┴▭┴ ANSI: ┬∿┬ ├∿┤ ┴∿┴ | Top (┬) and bottom (┴) lines are common nodes; vertical lines (├) connect resistors to nodes. All resistors share the same input/output voltage, current splits across branches. |
| Mixed Resistor Network | IEC: ▭-┬▭┬-▭ ├▭┤ ANSI: ∿-┬∿┬-∿ ├∿┤ | Combination of series (end-to-end ▭/∿) and parallel (node-connected ▭/∿) structures. Series sections control total current, parallel sections adjust branch current distribution. |
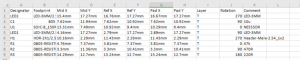
What Are Technical Parameter of Resistor Network?
| Technical Parameter | Description | Common Range |
| Resistance Value | The total equivalent resistance of the network, determined by its internal series/parallel configuration. It is the core parameter for circuit matching. | 1Ω ~ 10MΩ |
| Resistance Tolerance | The allowable deviation between the actual resistance value and the nominal value, affecting the precision of the circuit. | ±1%, ±2%, ±5%, ±10% |
| Power Rating | The maximum power the network can dissipate continuously without damage, related to the current and voltage it bears. | 1/8W, 1/4W, 1/2W, 1W, 2W |
| Temperature Coefficient (TCR) | The rate of change of resistance with temperature, determining the stability of the network in different environments. | ±10ppm/℃ ~ ±100ppm/℃ |
| Operating Temperature Range | The temperature range in which the network can operate normally without performance degradation or damage. | -55℃ ~ +125℃ |
| Package Type | The physical package of the network, affecting PCB installation, space occupation and application scenarios. | SMT (0402, 0603), DIP (16PIN, 8PIN) |
| Voltage Rating | The maximum voltage that can be applied across the network without breakdown, ensuring safe operation. | 10V ~ 200V (DC/AC) |
| Resistor Matching | The consistency of resistance values between individual resistors in the network, critical for precision applications. | ±0.1% ~ ±1% (precision type) |
What Are Examples of Resistor Networks?
Resistor networks appear in nearly every electronic device. Common examples include:
- Voltage Dividers: Mixed resistor networks used in sensors, thermostats, and audio equipment to split a voltage into smaller, precise values. For example, a network in a temperature sensor divides the input voltage to correspond with specific temperature readings.
- LED Arrays: Series-parallel resistor networks that limit current to multiple LEDs, ensuring consistent brightness and preventing burnout. This is common in LED lights, display panels, and indicator lights.
- Filter Circuits: Resistor networks paired with capacitors or inductors to filter out unwanted signals. These networks are used in radios, televisions, and communication devices to improve signal quality.
- Can Network Termination Resistor: A specialized resistor network used in CAN bus systems to prevent signal reflection and ensure reliable data transmission between devices in automotive and industrial applications.
Why Use a Resistor Network?
Here are reasons why use a resistor network:
- Space Savings: Resistor networks integrate multiple resistors into one compact package, significantly reducing PCB space. This is essential for small electronic devices such as wearables, smartphones and medical equipment, as they occupy much less space than individual resistors installed separately.
- Consistent Performance: All resistors in a network are produced under the same manufacturing conditions, ensuring consistent resistance values, temperature coefficients and power ratings. This avoids performance deviations that often occur when using individual resistors from different production batches.
- Simplified Assembly: Installing a single resistor network is more efficient than soldering multiple individual resistors. It shortens assembly time and reduces the chance of soldering mistakes, which is particularly advantageous for high-volume production lines.
- Cost-Effective for Mass Production: Although a single resistor network may cost more than one individual resistor, it is more economical than buying multiple separate resistors. It also cuts down on labor costs during assembly, making it a cost-efficient option for mass-produced electronics.
- Easy Circuit Design: Resistor networks come with pre-determined configurations (series, parallel or mixed), eliminating the need to design and wire multiple individual resistors. This simplifies circuit design and reduces the risk of wiring errors.
- High Reliability: The integrated design of resistor networks reduces the number of connection points, lowering the risk of loose connections or contact failures. This enhances the overall reliability of the circuit, especially in harsh operating environments.
- Compatibility with Precision Applications: Resistor networks offer highly matched resistors, making them suitable for precision circuits such as medical devices, test equipment and aerospace electronics where consistent performance is critical.
When to Use Network Resistor?
Use a resistor network when your circuit requires multiple resistors with matching specifications, space is limited, or assembly efficiency is a priority. Specific scenarios include:
- High-Density Circuits: When designing compact devices like smartphones, tablets, or IoT sensors, a resistor network saves valuable PCB space and keeps the design clean.
- Precision Applications: precision resistor network is ideal for circuits that require consistent resistance values, such as medical devices, test equipment, and aerospace electronics, where even small variations can impact performance.
- High-Volume Production: Resistor networks simplify assembly, reduce error rates, and lower costs in mass-produced electronics like consumer gadgets and automotive components.
- Custom Requirements: custom resistor networks can be designed to meet unique resistance values, package sizes, and connection configurations, making them suitable for specialized industrial or military applications.
How to Read a Resistor Network Diagram?
Reading a resistor network diagram is a fundamental skill for working with electronic circuits, and it becomes simple with clear, step-by-step guidance. Below are detailed, actionable steps to help you accurately interpret any resistor network diagram, including practical tips to avoid common mistakes:
1. Identify the Network Type First: Start by determining whether the resistor network is series, parallel, or mixed. For series networks, look for resistors connected end-to-end in a single, unbroken path with no branching wires between them, so current can only flow through one path. For parallel networks, resistors connect across two common nodes with multiple branching paths from input to output. For mixed networks, you’ll see both series and parallel sections combined. This step avoids misinterpreting the network’s structure, critical for accurate calculations.
2. Label All Nodes Clearly: Each node is a connection point for two or more components. Use a pencil or digital tool to label each node with a letter or number. Nodes with the same label are electrically connected even if drawn far apart, a common source of confusion in complex networks. For example, two resistors connected to the same two nodes are in parallel regardless of their position.
3. Check and Record Resistance Values: Locate the resistance value (in ohms, Ω) on each resistor. Some diagrams include power ratings (watts, W) to confirm the resistor can handle the circuit’s current. Write down each value next to its label to avoid mixing them up. Some diagrams use standard notation like 1kΩ for 1000Ω or 2.2MΩ for 2,200,000Ω, so familiarize yourself with these abbreviations.
4. Follow Current Paths Step-by-Step: Trace current from the input terminal (usually labeled “VIN” or “INPUT”) to the output terminal (“VOUT” or “OUTPUT”). For series networks, current flows through each resistor in sequence and the circuit breaks if one resistor is removed. For parallel networks, current splits at the input node, flows through each branch, then recombines at the output. For mixed networks, trace series sections first, then parallel branches to visualize voltage and current distribution.
5. Verify Connections with Junction Dots: Small dots at junctions indicate electrical connections between wires. Wires crossing without a dot are not connected and do not share current or voltage. Confusing these is a common mistake. A dot at three wires’ intersection means all three connect to the same node, while crossing wires without a dot are independent.
6. Identify Power and Ground Terminals: Many diagrams include power (VCC, +5V, etc.) and ground (GND, 0V) terminals, critical for understanding operation. Locate these terminals and note their position relative to resistors. Power terminals supply voltage while ground provides a current return path, helping you determine current direction and calculate voltage drops.
7. Check for Switch or Component States: If the diagram includes switches, diodes or other components, note their state. Switches are open or closed and diodes are forward or reverse biased. These components change the network’s configuration, such as a closed switch bypassing a resistor or an open switch isolating a section. Ignoring these states leads to incorrect interpretations.
8. Cross-Verify with Symbol Standards: Refer to IEC and ANSI resistor network symbol standards to confirm correct interpretation. IEC uses rectangular boxes for resistors while ANSI uses zig-zag lines. Recognizing both prevents misidentifying symbols, useful when working with international diagrams.
9. Document Your Findings for Reference: After reading the diagram, write down key details including network type, resistor values, node labels, input/output terminals and special components. This documentation aids later calculations, troubleshooting or modifications and reduces errors when sharing the diagram.
How to Calculate Resistor Network?
Calculating a resistor network involves finding total resistance, current, and voltage across each resistor. The method varies by network type, and below are clear, actionable calculation tips and methods to ensure accuracy without unnecessary complexity:
- Series Resistor Network Calculation: Total resistance (R_total) equals the sum of all individual resistances (R_total = R1 + R2 + … + Rn). Current (I) is consistent through all resistors, calculated as I = V_input / R_total. Voltage across each resistor (Vn) is I × Rn, and the sum of all individual voltages equals the input voltage.
- Parallel Resistor Network Calculation: Total resistance (R_total) is calculated as 1 / (1/R1 + 1/R2 + … + 1/Rn). For two parallel resistors, use the shortcut R_total = (R1×R2)/(R1+R2) for faster results. Voltage (V) is the same across all resistors (equal to input voltage), and current through each resistor (In) = V / Rn.
- Mixed Resistor Network Calculation: Break the network into separate series and parallel sections first. Calculate the equivalent resistance of each section, then combine them to find the overall R_total. Use Ohm’s Law (V = I × R) to find current and voltage for each section, working from the simplest section to the most complex.
- Precision Resistor Network Calculation: For precision resistor networks, account for tolerance (usually ±1% to ±5%) when calculating. Add or subtract the tolerance percentage from each resistor’s value to determine the minimum and maximum possible total resistance, ensuring the network meets your circuit’s precision requirements.
- Current Distribution in Parallel Networks: In parallel resistor networks, current divides proportionally to resistance values. Resistors with lower resistance draw more current. Use the formula In = (V / Rn) to find current through each branch, and verify that the sum of all branch currents equals the total current.
- Voltage Division in Series Networks: In series resistor networks, voltage divides based on resistance. Use the voltage divider formula Vn = (Rn / R_total) × V_input to quickly find the voltage across any individual resistor in the series.
- Using Multimeter to Verify Calculations: After calculating total resistance, use a multimeter to measure the actual resistance of the resistor network. Compare the measured value to your calculated value. Small deviations are normal (due to tolerance), but large differences indicate a calculation error or faulty component.
- Common Calculation Mistakes to Avoid: Do not mix resistance units (e.g., kΩ and Ω) without converting to the same unit first. Avoid miscalculating parallel resistance (remember to take the reciprocal of the sum of reciprocals). For mixed networks, do not skip simplifying sections—this leads to incorrect total resistance.
Practical Example: For a mixed resistor network with R1=1kΩ (series) and R2=2kΩ parallel with R3=2kΩ. First, calculate the parallel section: R2||R3 = (2×2)/(2+2) = 1kΩ. Then total resistance = 1kΩ + 1kΩ = 2kΩ. With an input voltage of 10V, total current = 10V / 2kΩ = 5mA. Voltage across R1 is 5mA × 1kΩ = 5V, and voltage across R2/R3 is also 5V (parallel voltage equality). Current through R2 and R3 is each 5V / 2kΩ = 2.5mA, totaling 5mA (matching total current).
How to Solve a Resistor Network?
Solving a resistor network means determining all current and voltage values across each resistor. Below are practical, concise steps to solve any network, including useful tips for accuracy and efficiency:
- Simplify the Network Step-by-Step: For mixed networks, first isolate series and parallel sections. Replace each section with its equivalent resistance to reduce the network to a single equivalent resistor. This simplifies total current calculation and avoids confusion with complex connections.
- Calculate Total Current: Use Ohm’s Law (I = V / R) with the input voltage and total equivalent resistance. This total current is the foundation for finding all individual resistor values in the network.
- Work Backwards to Find Section Values: Use the total current to determine voltage and current for each simplified section. For series sections, current is consistent; for parallel sections, voltage is the same across all branches.
- Apply Node Voltage Method for Complex Networks: For intricate mixed networks, use the node voltage method. Select a reference node (ground), label other nodes, and use Kirchhoff’s Current Law to write equations for each node, then solve for node voltages.
- Use Mesh Analysis for Planar Networks: For planar resistor networks (no crossing wires), use mesh analysis. Assign mesh currents, write Kirchhoff’s Voltage Law equations for each mesh, and solve to find individual branch currents.
- Verify with Kirchhoff’s Laws: Confirm calculations using Kirchhoff’s Voltage Law (sum of voltages in a loop = 0) and Kirchhoff’s Current Law (sum of currents at a node = 0). This eliminates calculation errors.
- Account for Resistor Tolerance: When solving precision networks, include resistor tolerance (±1% to ±5%) to find minimum and maximum possible values. This ensures the solution aligns with real-world component variations.
- Use Multimeter to Cross-Check: After solving, measure actual current/voltage with a multimeter. Small deviations from calculated values are normal (due to tolerance), but large gaps indicate mistakes.
- Simplify with Equivalent Source Transformation: For networks with voltage or current sources, convert sources to their equivalent form (voltage to current or vice versa) to simplify complex sections before solving.
- Document Calculations for Reference: Write down key steps, equivalent resistances, and final values. This helps with troubleshooting later and ensures consistency if the network is modified.
How to Examine the Resistor Network?
Examining a resistor network ensures it is functioning correctly and meets specifications. Below are practical, concise steps to inspect and test a network, providing actionable tips for accurate assessment without redundancy:
1. Visual Inspection: Check for physical damage, such as cracked packages, loose leads, or burnt resistors. Look for soldering defects like cold joints or bridging between leads. Also inspect for corrosion on leads or PCB pads, which can cause poor connections.
2. Resistance Measurement: Use a multimeter to measure the total resistance of the network. Compare the measured value to the specified value. A significant difference (exceeding resistor tolerance) indicates a faulty resistor or poor connection. Measure in an unpowered circuit to avoid damage to the multimeter.
3. Voltage and Current Testing: Apply the rated input voltage and measure the output voltage and current. Ensure values match the circuit’s design specifications. Deviations may indicate a damaged resistor, incorrect wiring, or mismatched component ratings.
4. Temperature Check: Operate the network at its rated load for a few minutes. Use a thermal probe to check for overheating. Excessive heat indicates a resistor is overloaded or faulty. Normal operation should result in mild, uniform warmth, not hot-to-touch surfaces.
5. Continuity Test: Use a multimeter’s continuity mode to check for open or short circuits. A beep indicates continuity (normal), while no beep suggests an open circuit. Test between all network terminals to confirm no unintended shorts or breaks.
6. Tolerance Verification: For precision networks, measure resistance at different temperatures (if possible) to check tolerance consistency. Ensure the network’s resistance stays within the specified tolerance range (typically ±1% to ±5%) to avoid performance issues.
7. Terminal Connection Check: Inspect terminal connections for tightness (for through-hole networks) or proper soldering (for surface mount). Loose or cold solder joints can cause intermittent performance or resistance fluctuations.
8. Compare with Datasheet: Cross-reference measured resistance, voltage, and current values with the network’s datasheet. This confirms the component is operating within its rated parameters and not being overstressed.
9. Environmental Inspection: Check for exposure to moisture, dust, or chemicals, which can degrade resistor networks over time. These contaminants can cause corrosion or short circuits, especially in industrial or outdoor applications.
10. Batch Consistency Check: For high-volume applications, test a sample of networks from the same batch. Consistent resistance values across samples ensure quality control and avoid circuit inconsistencies.

Resistor Network VS Array: Which is Better for You?
Resistor networks and resistor arrays are often confused, but they have distinct differences. The table below compares their key features to help you choose the right component for your application:
| Feature | Resistor Network | Resistor Array |
|---|---|---|
| Internal Connection | Pre-wired in series, parallel, or mixed configurations | Individual resistors with no internal connections; each resistor has its own input and output |
| Function | Performs a specific electrical function (voltage division, current limiting) | Provides multiple independent resistors in a single package for general use |
| Resistance Matching | Highly matched resistors (critical for precision applications) | Resistors may have varying values; no requirement for matching |
| Package Size | Compact, with fewer leads (depends on configuration) | Larger package with more leads (one per resistor plus common ground if applicable) |
| Applications | Precision circuits, voltage dividers, filter circuits, CAN bus systems | General-purpose circuits, LED drivers, logic gates, where independent resistors are needed |
| Cost | Higher cost per resistor (due to matching and pre-wiring) | Lower cost per resistor (simpler manufacturing) |
What Are Common Resistor Network Problems and Solutions?
Resistor networks can experience issues that affect circuit performance. Below are common problems and step-by-step solutions:
Problem 1: Incorrect Resistance Value
Solution 1: 1. Check the resistor network’s part number against the circuit design specifications to confirm it is the correct model. 2. Power off the circuit completely, then use a multimeter set to resistance mode to measure the network’s total resistance. 3. Compare the measured value with the specified resistance (accounting for ±1% to ±5% tolerance). 4. If the measured value exceeds the tolerance range, replace the resistor network with the correct part that matches the design’s resistance and power rating.
Problem 2: Overheating
Solution 2: 1. Power off the circuit and let the network cool down completely. 2. Check the network’s power rating (in watts) against the circuit’s actual load current and voltage (calculate power via P=V×I). 3. If the network’s power rating is lower than the actual load, replace it with a higher-rated model. 4. Use a multimeter to check for short circuits in the circuit connected to the network, as shorts cause excess current and overheating; repair any shorted components before reinstalling the network.
Problem 3: Poor Soldering
Solution 3: 1. Power off the circuit and use a magnifying glass to inspect all solder joints of the network’s leads. 2. Identify cold joints (dull, grainy solder) or bridging (solder connecting adjacent leads) and desolder the faulty joints with a soldering iron and desoldering wick. 3. Re-solder the leads using a soldering iron set to 350-400℃ (adjust based on package type: 350℃ for surface mount, 380-400℃ for through-hole). 4. Ensure each solder joint is smooth, shiny, and only covers the lead and PCB pad without bridging.
Problem 4: Damaged Resistors
Solution 4: 1. Power off the circuit and disconnect the resistor network from the PCB. 2. Use a multimeter to test each resistor in the network (if leads are accessible) by touching the multimeter probes to the corresponding terminals. 3. If any resistor shows infinite resistance (open) or zero resistance (short), the entire network must be replaced (most resistor networks are not repairable). 4. Install the new network, ensuring correct lead alignment and proper soldering as per the PCB layout.
Problem 5: Signal Interference
Solution 5: 1. Relocate the resistor network at least 2cm away from high-frequency components (e.g., oscillators, antennas, power amplifiers). 2. If interference persists, replace the network with a shielded package to block external signal intrusion. 3. Check the circuit’s ground connections; ensure the network is connected to a clean ground (not shared with high-current components) to eliminate ground loops. 4. For severe interference, add a small filter capacitor (100nF) near the network’s input terminal to suppress high-frequency noise.
By understanding these common issues and their solutions, you can minimize downtime and ensure your resistor network operates reliably. Whether you’re designing a new circuit or troubleshooting an existing one, a clear grasp of resistor network fundamentals is essential for success.