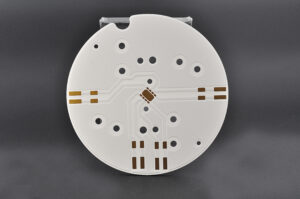
As we all know if ceramic PCB is very fragile, so it is not easy to do SMT for them.
But we can do the SMT for ceramic PCB easily because we do it every day and we have more than 15 years experiences for doing that.
For the almost SMD components (such as SMD rsistors, capacitors, diode etc), normally we will add the solder paste by using SMT stencil, then put the components by machine, finally do the oven reflow.
For some special components, we will need to solder it by hand, such as through connectors, but it can’t be soldered by hand directly, it need to be put on the heating table to keep the temperature is high enough to make the solder past at melt state. Because the ceramic material with very good heat dissipation, the solder paste will be solidification very easily if don’t put the ceramic PCB on heating table
For some small LED, it can’t be put by SMT machine, because no such small feeder to pick it up, then need to put it on board by hand.
We can do very well for the small BGA components too.
In Best Technology, currently the most common metal used for Metal Core PCB manufacturer are Aluminum, Copper. Today let’s talk about the main differences between aluminum substrate and copper substrate, hoping to help you choose the right substrate in future design projects.
Although they both share similar properties and functions, there are still a few variations between the two kinds of metals. Some of the key differences between aluminium and copper core PCBs are explained in the points below.
1. Thermal Conductivity
The thermal conductivity of copper substrate is up to about 400(W/mK) and the thermal conductivity of aluminum substrate is generally about 200W(W/mK). The thermal conductivity is higher, the transfer efficiency will be better, and the heat dissipation will be better, then the working life will be longer.
 Thermal Conductivity
2.Electrical Conductivity
Both aluminum and copper, being metals, are electrical conductors of electricity, although the exact degree of this varies between the two metals. When it comes to electrical conductivity, copper has a clear advantage over aluminum. In other words, in applications where there is a need for efficient electrical conductivity, copper makes for an ideal pick.
 Electrical Conductivity
3. Electrical Resistance
Resistance is very important when it comes to PCB design, as it can have an effect on the overall function and stability of the component. Given that copper has a higher density than aluminum, it tends to have a lower resistance than aluminum, so copper is an better choice where there’s a requirement for thinner circuits and faster electricity transfer.
Electrical Resistance
4. Weight
Since copper has the higher density for per unit area, the weight of copper PCB is much heavier than aluminum PCB for the same design.
In applications where light-weight construction is required more than anything else, aluminum is the preferred material of choice. On the other hand, applications where weight is not much of an issue, tends to be the ones where copper is widely used.
Weight
5. Application
Copper core PCB is the best heat dissipation among all MCPCB, so it’s mostly used in automobile headlights, taillights and some high-tech electronic products (unmanned aircraft, mining machine) high-power lighting equipment. The aluminum core PCB is mostly used in indoor lighting, energy saving lighting, street lighting and other energy-saving lighting electronic products.
Application
Application
In conclusion, due to the above different parameters and performance, the cost of copper is generally more expensive than aluminum. If you have other questions about MCPCB, welcome to contact us .
Every printed circuit board need to do full test before ship to our customer. but you may have doubt, the PCB was made according to the original Gerber file, why finish the PCB production process, why the short Circuit will occur on a FR4 circuit board?
A short circuit may also occur during reflow soldering. the solder paste may accidentally connect two pins that are very close to each other. In some cases, errors can occur during the PCB design process because the wiring between different networks accidentally connects.
We believe every PCB manufacture have their own test method to do short circuit, but today I would like share how Best Technology to Check for Short Circuits in a Printed circuit board.
Here are some important steps:
Step 1 Visual inspection
The first step for locating short circuits on PCB is to carefully look at the entire surface of the PCB. Best Technology QC guys use a magnifying glass or low magnification microscope during the circuit board examination. We check the whole board surface to see if there are some traces break off. Any cracks or blobs of solder should get careful attention. Check all your vias. If you specified unplated vias, make sure that’s the case on the board. Poorly plated vias can create a short circuit between layers and leave you with everything tied to ground, VCC, or both.
visual inspection
All the testing work will carry out according to IPC 6012 class 2.
Step 2 Use a Digital Multimeter to find out where is the problem
To test a circuit board for a short circuit, you need to check the resistance between different points in the circuit. If visual inspection doesn’t reveal any clues as to the location or cause of the short circuit, grab a multimeter and try to track down the physical location on the printed circuit board. The multimeter approach gets mixed reviews in most electronics forums, but tracing your test points can help you figure out what isn’t the problem.
Step 3 use Probe flying Tester &E-tester
As long as you are in Printed Circuit board field, you are definitely known Probe flying test and E-Teter.
Flying probe test systems require no test fixture, it can serve both prototype and small production, providing maximum flexibility for PCB manufacturers and this job can complete in a short time.
probe flying test
probe flying test-1
But when your circuit board become to volume, you will need to open a test tooling/test fixture to test the Printed Circuit board to test the open short circuit.
E-tester
In my next blog in June, I will introduce Probe flying test to you in more detail.
If you have any question about printed circuit board, you are welcome to contact Best Technology.
It is our great pleasure to communicate with you for any issue for printed circuit boards.