





Learning how to solder a PCB circuit board starts with one controlled action: heat the component lead and copper pad together, then feed solder into the hot joint rather than melting it on the iron. Work only on an unpowered, low-voltage board, keep the PCB stable, use ventilation, and inspect every connection before applying power.
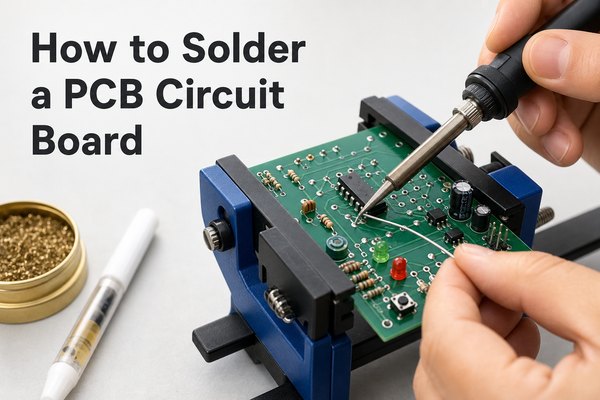
Soldering circuit boards for beginners is easiest on a simple through-hole practice kit. Large pads and leads are more forgiving than fine-pitch surface-mount parts, and a low-cost practice board lets you learn heat control without risking valuable equipment.
Can You Solder a Circuit Board Yourself?
Yes, you can hand-solder through-hole parts, wires, connectors, and many larger surface-mount components when the board is safe to service and you have the right tools. The first job should be a practice board, not a mains-powered product, battery protection circuit, expensive multilayer assembly, or densely packed phone motherboard.
Stop and use a trained technician when the assembly contains exposed mains voltage, charged high-voltage capacitors, damaged lithium cells, unknown conformal coating, very fine-pitch packages, or hidden BGA joints. Soldering skill does not remove electrical, fire, or component-handling hazards.
What Do I Need to Solder a Circuit Board?
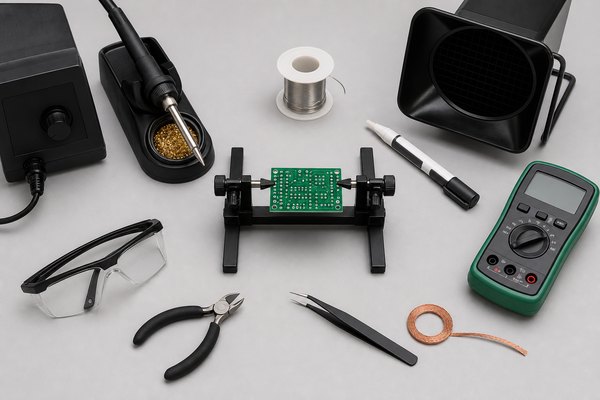
For readers asking “what do I need to solder a circuit board,” the essential kit is small but each item has a specific job:
- Temperature-controlled soldering iron: maintains stable heat instead of cycling unpredictably.
- Chisel or bevel tip: transfers heat efficiently to both the pad and lead; use a smaller tip for tighter spaces.
- Electronics solder: choose an alloy and diameter suited to the board, and follow its datasheet.
- Compatible flux: improves wetting on clean, solderable metal surfaces.
- PCB holder: prevents movement while the joint cools.
- Tip cleaner and solder wick: maintain the tip and correct excess solder.
- Flush cutters and ESD-safe tweezers: place parts and trim through-hole leads.
- Magnification and multimeter: support visual and continuity checks.
- Safety glasses and fume extraction: protect the operator and keep fumes away from the breathing zone.
What Soldering Circuit Board Temperature Should You Use?
There is no single soldering circuit board temperature for every assembly. The correct setting depends on solder alloy, tip geometry, joint size, copper area, board construction, and component heat tolerance. Start with the solder and component manufacturers’ recommendations, then use the lowest setting that produces prompt, complete wetting.
| Situation | Practical approach | What to watch |
| Small through-hole joint | Use a clean medium tip and the alloy supplier’s recommended hand-soldering range | Solder should wet the pad and lead quickly without prolonged contact |
| Lead-free solder | Expect a smaller process window and maintain a clean, well-tinned tip | Do not compensate for poor heat transfer by holding the iron on the pad too long |
| Large ground pad or connector | Use a wider tip with more thermal mass before increasing temperature | Slow wetting may come from heat loss into copper planes |
| Delicate SMD or flexible circuit | Follow the component and board process limits; reduce dwell time | Lifted pads and thermal damage can occur quickly |
For a deeper explanation of alloys, thermal mass, and process windows, see the BestPCBs guide to ideal soldering temperature for circuit boards.
How Should You Prepare the PCB and Components?
Good preparation reduces the amount of heat and rework needed at the joint. Before the iron touches the board:
- Disconnect every power source and confirm the board is unpowered.
- Check component value, reference location, pinout, and polarity against the assembly information.
- Inspect the pad and lead for oxidation, contamination, lifted copper, or old damaged solder.
- Secure the PCB so it cannot slide or rotate.
- Fit a tip that contacts both the lead and pad without touching nearby features.
- Clean and tin the tip with a thin, fresh solder coating.
- Apply only enough compatible flux to support wetting.
Diodes, LEDs, electrolytic capacitors, transistors, and integrated circuits may be orientation-sensitive. Confirm polarity or pin 1 before soldering; correcting the part afterward adds unnecessary heat cycles and increases pad-lift risk.
How Do You Solder a PCB Circuit Board Step by Step?
The basic through-hole sequence is short, but the order matters:
- Insert and secure the component. Keep it correctly oriented and seated as the design requires.
- Place the iron on the joint. Touch the tip to the pad and component lead at the same time.
- Feed solder into the heated joint. Bring solder to the opposite side of the lead, not directly onto the tip.
- Watch the solder flow. Stop feeding once it wets the lead and forms a modest fillet around the pad.
- Remove the solder, then the iron. This prevents the wire from sticking to the cooling joint.
- Keep the joint still. Movement during solidification can create a disturbed or weak connection.
- Inspect before trimming. Confirm wetting and clearance, then cut the excess lead without stressing the pad.
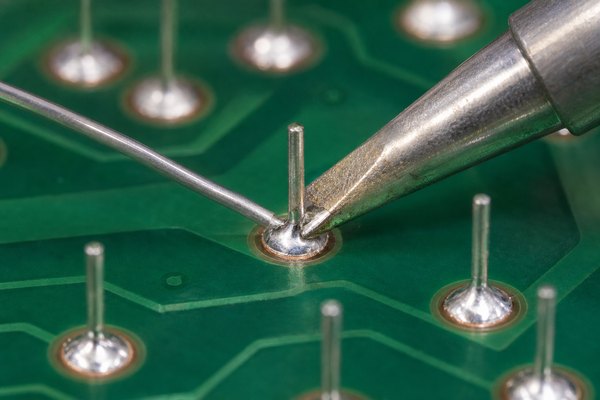
The same heat-transfer principle is explained in BestPCBs’ broader PCB board soldering guide, which also covers automated assembly methods and manufacturing inspection.
How to Solder a Circuit Board With a Soldering Iron?
When learning how to solder a circuit board with a soldering iron, control comes from tip contact, not force. Rest the working face of the tip against both metal surfaces. A tiny amount of solder already on the tip can improve thermal contact, but the solder that forms the joint should be fed to the heated pad and lead.
- Use a tip close to the joint size; a needle-like tip may transfer heat poorly.
- Keep the tip bright and tinned. Oxidized black surfaces do not transfer heat well.
- Do not press hard. Pressure can damage the pad and does not replace adequate thermal contact.
- If wetting is slow, stop, let the area cool, clean the tip, add flux, and reassess the tip size.
- Never chase a stubborn joint with repeated long heating cycles.
How Do You Solder Different Circuit Board Components?
Different parts need the same core technique but different handling:
| Component | Key handling point | Common mistake |
| Resistor | Seat consistently and bend leads only enough to hold position | Pulling the body tight while the joint is cooling |
| Diode or LED | Verify polarity before heating | Installing the cathode in the wrong orientation |
| Electrolytic capacitor | Confirm polarity and keep the body within its intended clearance | Reversing polarity or overheating one lead repeatedly |
| Connector | Tack one pin, check alignment, then finish the remaining pins | Soldering every pin before correcting a tilted housing |
| Wire | Use strain relief and avoid wicking solder too far under the insulation | Relying on the solder joint as the only mechanical support |
How Should Beginners Handle SMD Components?
Begin with larger two-terminal SMD parts on a practice board. Apply flux, lightly tin one pad, reheat that pad while positioning the component with tweezers, then solder the other end. Return to the first joint only if its alignment or solder volume needs correction.
Fine-pitch ICs, tiny passives, thermal pads, and BGAs require better magnification, process control, and often hot-air or reflow equipment. A conventional iron can handle some accessible SMD work, but it cannot inspect or repair hidden joints. Do not treat a successful through-hole joint as proof that an advanced assembly is safe to rework.
How Do You Recognize a Good Solder Joint?
A sound through-hole joint wets both the pad and lead, has a smooth continuous fillet, stays within the pad area, and does not touch adjacent conductors. Exact surface appearance varies with alloy, so shape, wetting, coverage, and electrical isolation matter more than whether the joint looks mirror-bright.
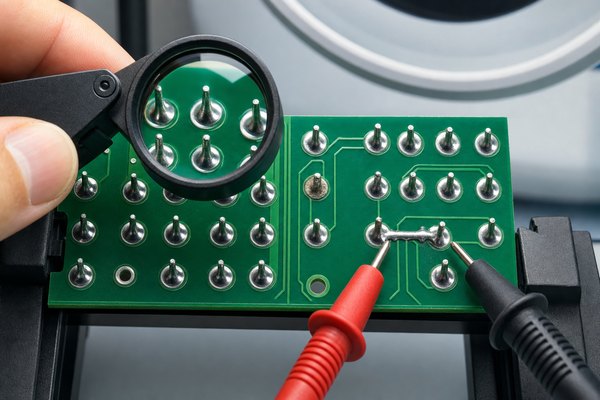
Inspect with magnification from several angles. Look for exposed unwetted pad, solder balls, cracks, movement marks, excessive solder, bridges, scorched laminate, and lifted copper. A multimeter continuity check can help confirm suspected opens or shorts, but it does not replace correct visual inspection or functional testing.
Which Common Soldering Mistakes Damage a PCB?
Most beginner damage comes from excessive heat exposure, poor preparation, or mechanical force:
- Heating only the solder: produces a blob that may not wet the pad or lead.
- Using a tip that is too small: encourages long dwell time because heat transfer is weak.
- Adding too much solder: hides the joint and raises bridge risk.
- Moving the part while cooling: disturbs the joint before it solidifies.
- Repeating heat cycles: can loosen pads and stress components.
- Prying a lead or component: may lift copper even when solder still holds one area.
- Working on a powered board: creates shock, short-circuit, and component-damage hazards.
How Do You Fix a Cold Joint or Solder Bridge?
For a poorly wetted or disturbed joint, let the board cool, add compatible flux, reheat the pad and lead together, and use only enough fresh solder to restore a complete fillet. If contamination or damaged plating prevents wetting, repeated reheating is not the answer; inspect the surface and repair condition first.
For a solder bridge, apply flux and remove excess solder with clean wick or an appropriate desoldering tool. Do not drag molten solder across nearby pads. After correction, inspect the copper for damage and verify electrical isolation. The BestPCBs tutorial on how to desolder a circuit board covers component removal and pad-protection techniques in more detail.
How Do You Clean and Test the Board?
Cleaning depends on the flux chemistry and the assembly requirements. Follow the flux manufacturer’s instructions; some residues are intended to remain, while others require a compatible cleaner and controlled process. Keep liquid away from switches, relays, displays, microphones, unsealed connectors, and other parts that can trap contamination.
- Allow the board to cool completely.
- Inspect every soldered location and nearby pads.
- Clean only with a method compatible with the flux, PCB, and components.
- Let the assembly dry before electrical checks.
- Check for unintended shorts and required continuity with the board unpowered.
- Apply power through an appropriate current-limited test setup when the design permits.
- Run the intended functional test instead of judging success by appearance alone.
For process-specific cleaning considerations, see how to clean assembled PCBs after soldering.
Frequently Asked Questions
Can you solder a circuit board without flux?
Some solder wire contains a flux core, but additional compatible flux often improves wetting during repair or rework. Do not assume more flux is always better; select the chemistry for the assembly and follow its cleaning requirements.
Should solder be applied to the iron or the joint?
A small amount on the tip helps heat transfer, but the solder that forms the connection should be fed to the heated pad and lead. Melting a large blob only on the tip can leave one or both surfaces insufficiently heated.
How long should the iron stay on a PCB pad?
Only long enough to achieve prompt wetting. A fixed time is unreliable because alloy, tip, copper area, and component mass vary. If the joint does not respond quickly, stop and correct the setup rather than extending heat indefinitely.
Why does solder form a ball instead of flowing?
The pad or lead may be cold, oxidized, contaminated, or short of effective flux. Clean and tin the tip, confirm both surfaces are solderable, apply compatible flux, and heat the work rather than the solder wire alone.
Is a shiny joint always a good joint?
No. Alloy affects appearance. A good joint must show complete wetting, suitable fillet shape, mechanical stability, and separation from adjacent conductors. A bright blob that sits on top of an unwetted pad is still defective.
Can a soldering iron damage a circuit board?
Yes. Excess temperature, long dwell time, repeated rework, pressure, or prying can lift pads, weaken plated holes, discolor laminate, and damage components. Good tip selection and efficient heat transfer reduce the risk.
Can you use plumbing solder on a PCB?
Do not use plumbing solder or acid flux on electronics. Use solder and flux specifically intended for electronic assemblies and compatible with the materials and reliability requirements of the board.
How do you prevent solder bridges?
Use a tip suited to the pad pitch, apply controlled solder volume, keep the tip clean, and use compatible flux. Inspect adjacent pads under magnification before power-up. Remove excess solder with flux and wick when needed.
Can you solder a wire directly to a PCB?
Yes, when the board provides a suitable pad or plated hole and the wire has adequate strain relief. Avoid making the solder joint carry cable movement or pulling load, and verify polarity before soldering.
When should a PCB be professionally assembled or repaired?
Use professional support for mains voltage, damaged batteries, multilayer pad or via damage, fine-pitch ICs, BGA packages, expensive assemblies, safety-critical products, or work requiring controlled process records and inspection.
Need Reliable PCB Assembly Support for Your Project?
If hand soldering is no longer practical for your prototype or production volume, EBest Circuit can help turn your design into a finished PCB or PCBA. Use this PCB circuit board soldering guide when validating individual joints, or send us your Gerber files, BOM, assembly drawings, quantities, and test requirements for an engineering review. Our team can support component sourcing, controlled soldering, inspection, and functional testing so you can move from prototype to production with fewer assembly risks.
Ready to discuss your board? Contact EBest Circuit for PCB fabrication or assembly support and include your board specifications, expected volume, delivery target, and quality requirements.
You may also like








Tags: how to solder a circuit board with a soldering iron, how to solder a pcb circuit board, soldering circuit board temperature, soldering circuit boards for beginners, what do i need to solder a circuit board