

When a cold solder joint appears on a PCB, it might not fail immediately. But over time, it can cause real trouble—intermittent signals, unstable connections, or even complete circuit failure. These defects are often hidden, and if not caught early, they can waste time and money in rework.
In this blog, you’ll learn:
- What a cold solder joint looks like
- What causes it
- How to avoid and fix it
- Why a trusted PCB assembly partner like EBest Circuit (Best Technology) matters
What is a Cold Solder Joint?
A cold solder joint or cold joint solder, is a defective connection between a component lead or terminal and a PCB pad during PCB assembly process. Unlike a properly formed solder joint, which provides a strong, reliable electrical and mechanical connection, a cold solder joint fails to fully bond the two elements together.
When soldering is done correctly, the solder melts completely and wets both the component lead and the PCB pad, creating a smooth, shiny, and concave surface. In the case of a cold solder joint, however, the solder doesn’t reach its optimal melting point or doesn’t flow properly. This results in a rough, dull, and often uneven surface. The joint may look like it’s attached, but in reality, the connection is weak and prone to failure. It might conduct electricity intermittently or not at all, leading to erratic behavior in the electronic device, from occasional glitches to complete breakdowns.
Cold Solder Joint Causes
Several factors can contribute to the formation of cold solder joints. Understanding these causes is the first step in preventing them.
- Inadequate Soldering Temperature
One of the primary culprits is insufficient soldering temperature. Each type of solder has a specific melting range, and if the soldering iron or reflow oven doesn’t reach and maintain the appropriate temperature, the solder won’t melt fully. For example, if the temperature is too low, the solder may only partially liquefy, leaving solid particles that prevent a proper bond.
- Incorrect Soldering Time
If the soldering iron is applied for too short a time, the solder won’t have enough time to melt and flow properly. On the flip side, overheating the joint by leaving the soldering iron on for too long can also cause problems. It can damage the component leads, PCB pads, or even change the properties of the solder itself, potentially leading to a cold solder joint.
- Poor Surface Preparation
The cleanliness and condition of the surfaces to be soldered are vital. If the component leads or PCB pads are dirty, oxidized, or contaminated with oils, residues, or other substances, the solder won’t adhere properly. Oxidation, in particular, forms a thin layer on the metal surfaces that acts as a barrier to soldering.
- Inappropriate Flux Usage
Flux is a key component in the soldering process. It helps clean the surfaces, remove oxidation, and promote the flow of solder. However, using the wrong type of flux, too little flux, or applying it incorrectly can lead to cold solder joints. Some fluxes may not be compatible with certain solders or components, while insufficient flux won’t provide enough cleaning and wetting action.
- Component Movement During Soldering
When components move while the solder is still molten, it can disrupt the formation of a proper joint. This can happen due to vibrations during the soldering process, improper handling of the PCB, or insufficient securing of the components. Even a small movement can break the developing bond, resulting in a cold solder joint or a weak connection.
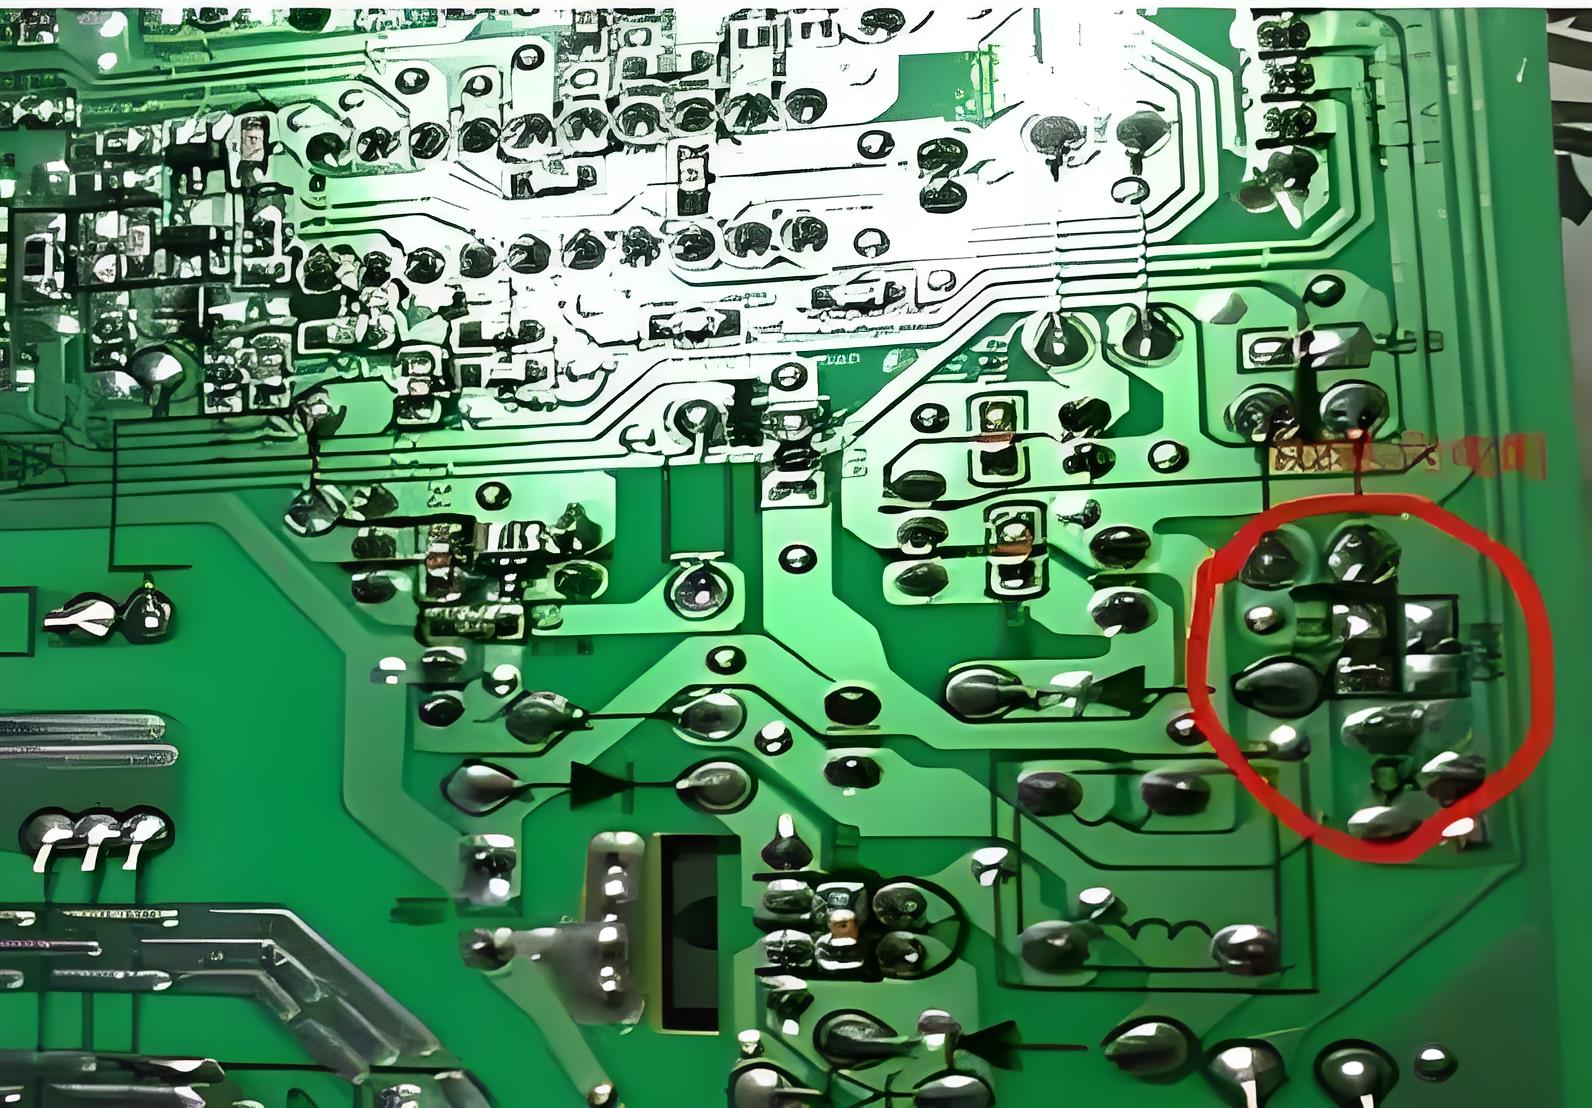
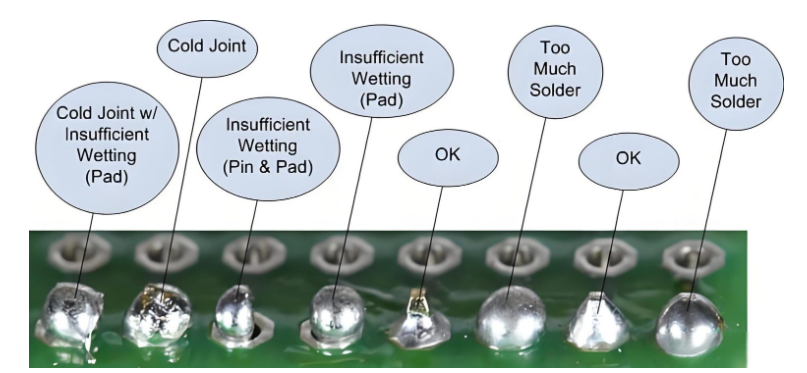
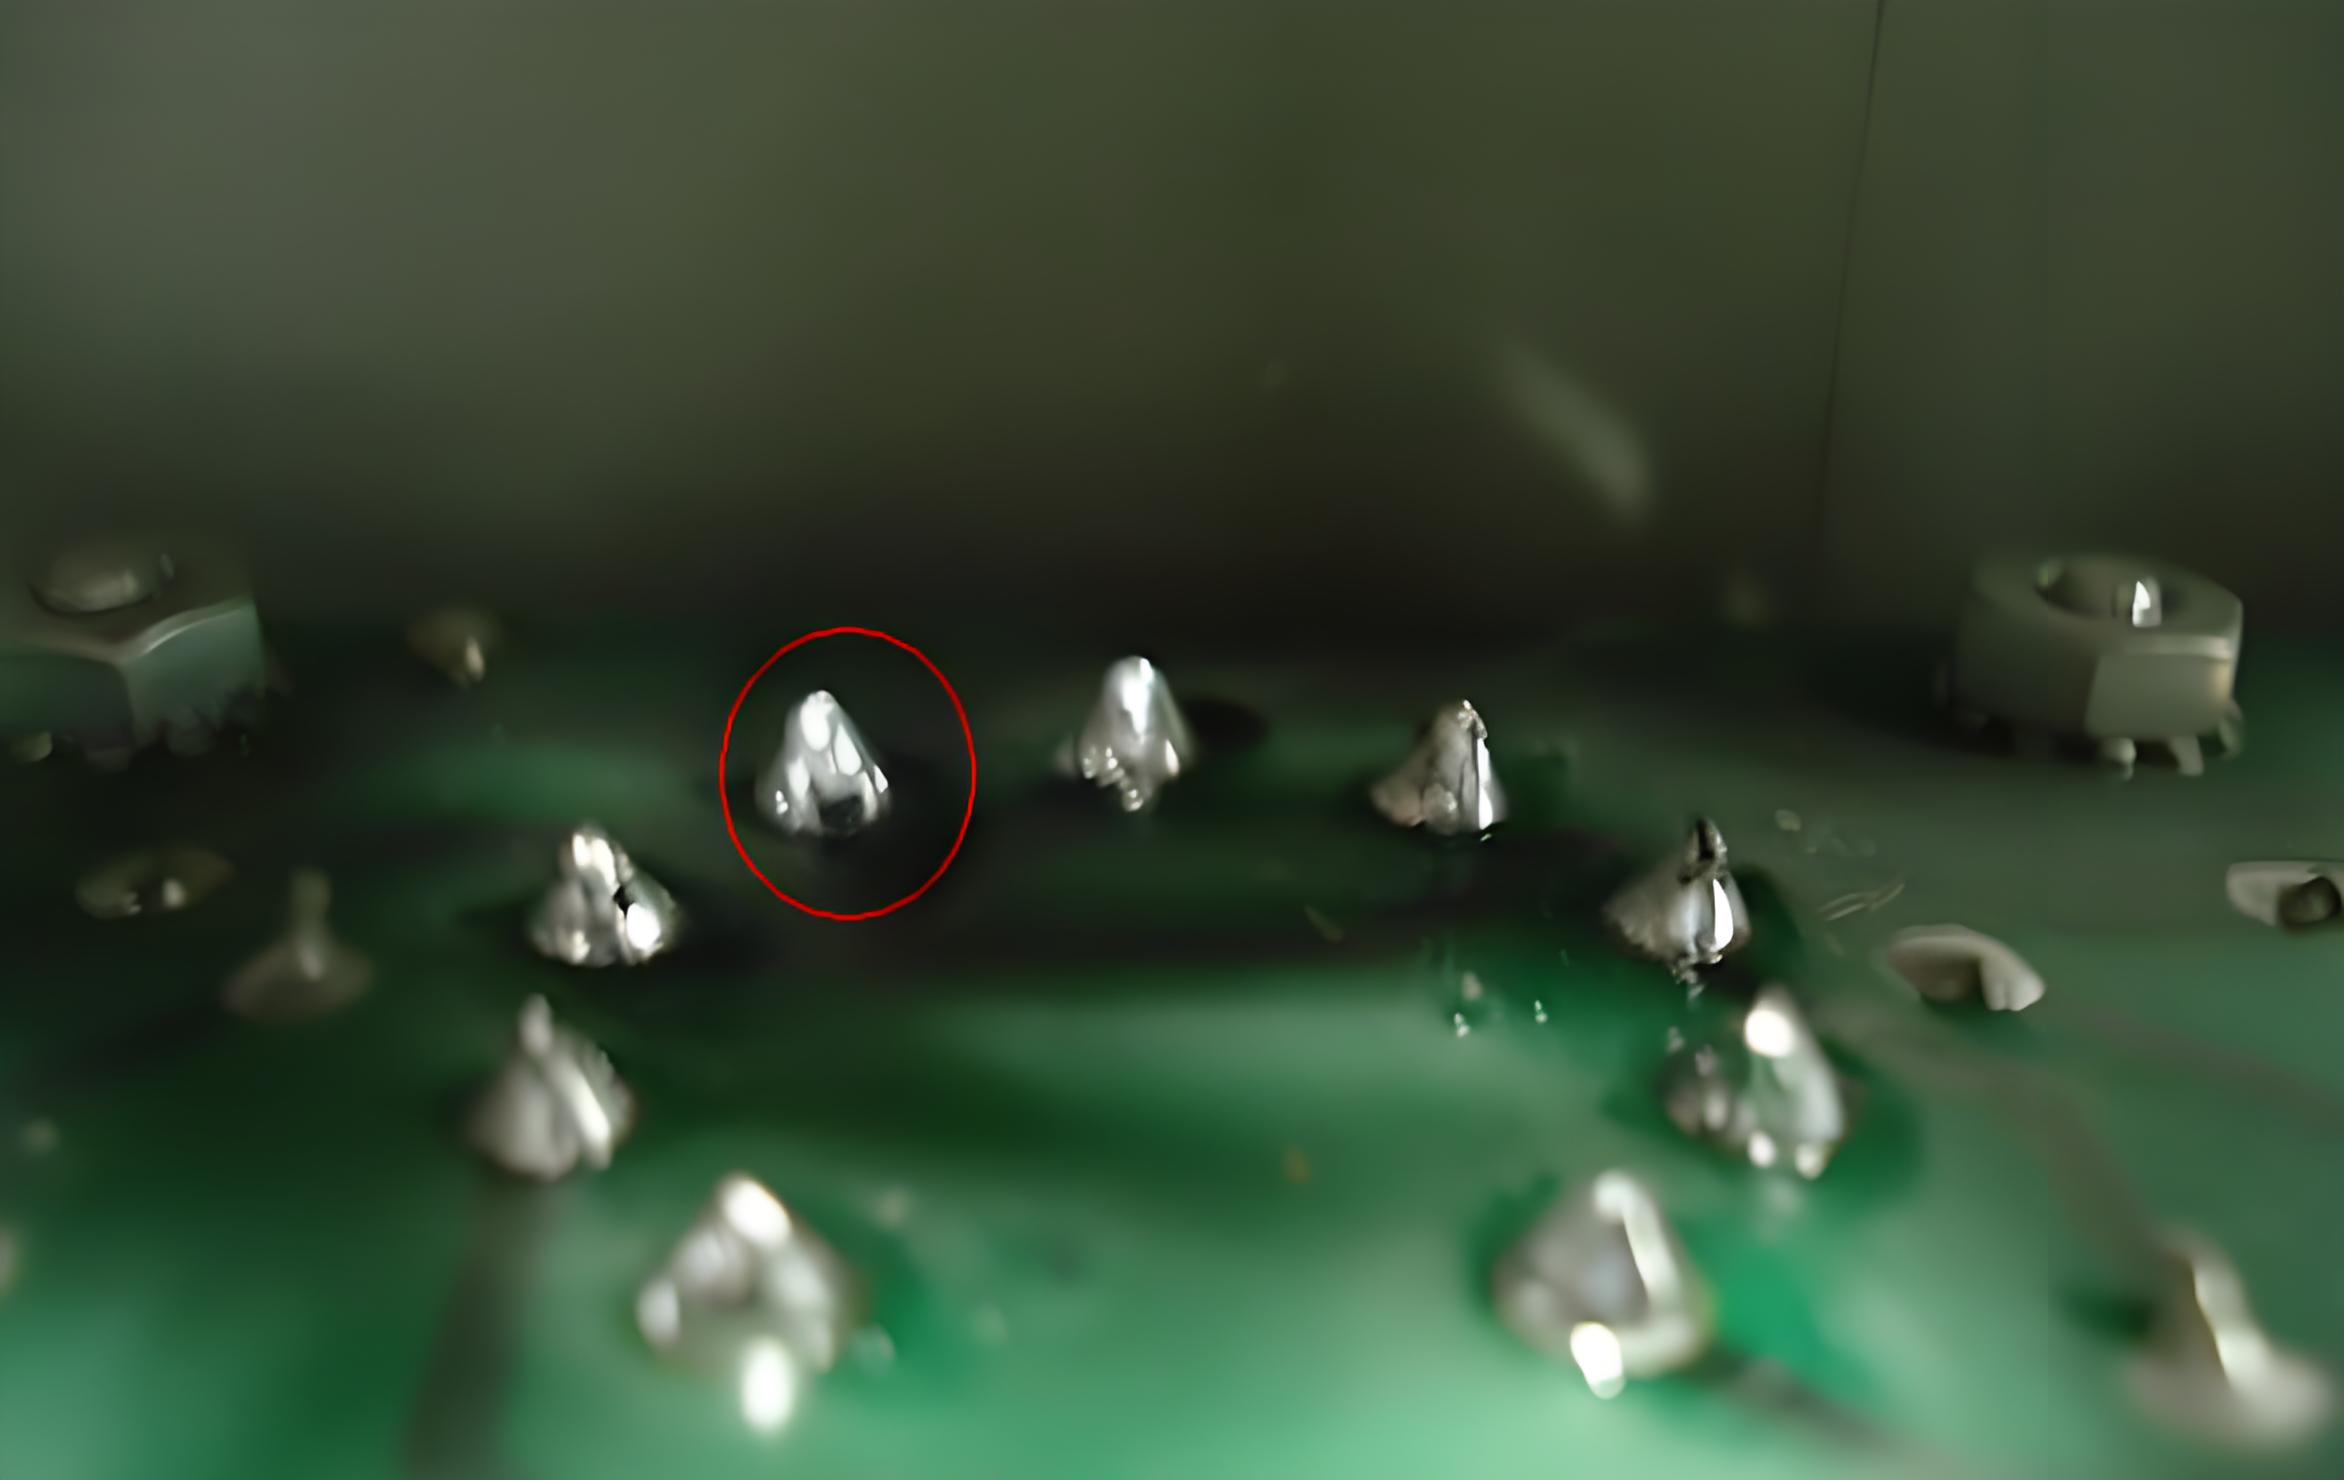
Cold Solder Joint Pictures
Visual aids can be extremely helpful in identifying cold solder joints. Here are common visual signs:
- Dull, Grainy Appearance: A good joint is shiny and smooth. Cold ones look frosty or matte.
- Cracks or Gaps: Visible separations or voids between the component and pad.
- Ball-Like Shape: If the solder beads up instead of flowing smoothly, it likely didn’t bond.
- Lifting Leads: Components that seem slightly off the pad may signal a cold joint underneath.
Below are some typical colder solder joint pictures examples:
How to Identify Good Solder Joint?
Identifying a good solder joint is just as important as recognizing a cold one. A high-quality solder joint has several distinct characteristics:
1. Appearance
A good solder joint should have a smooth, shiny, and concave surface. The solder should flow evenly around the component lead and onto the PCB pad, forming a natural fillet.
2. Wetting
Proper wetting is a key indicator of a good solder joint. The solder should spread and adhere evenly to both the component lead and the PCB pad, covering the surfaces completely. When the wetting is correct, there will be no gaps, voids, or bare spots where the metal surfaces are exposed.
3. Strength
A well-soldered joint should be strong enough to hold the component in place firmly. Gently tugging on the component (with appropriate care not to damage it) should reveal a solid connection.
How to Avoid Cold Solder Joints?
Prevention is better than repair. Here’s how to keep cold solder joints from happening in the first place:
1. Use the Right Temperature
Always set your soldering iron between 350°C to 400°C for standard lead-based solder. Higher temperatures may be needed for lead-free types.
2. Pre-Clean Pads and Leads
Use isopropyl alcohol to clean surfaces before soldering. Dirt and oxidation are invisible enemies.
3. Don’t Skip the Flux
Flux removes oxidation and improves solder flow. Many solder wires include it, but extra flux helps in difficult spots.
4. Keep Steady Hands
Hold the component and iron steady until the solder cools. Use clamps or tools if needed.
5. Pick Quality Tools
Poor-quality irons with unstable tips lead to inconsistent heat. Invest in a reliable soldering station with temperature control.
6. Work in a Clean, Static-Safe Area
Humidity, static, and poor lighting all raise the chances of making mistakes.
How to Fix Cold Solder Joints?
Despite our best efforts, cold solder joints may still occur. Fortunately, there are ways to fix them:
1. Soldering
The first step in fixing a cold solder joint is often desoldering. Use a desoldering pump or wick to remove the existing solder from the joint. Heat the joint with the soldering iron to remelt the solder, and then use the desoldering tool to suck up or absorb the molten solder. Make sure to remove all the old solder completely to start fresh.
2. Cleaning
After desoldering, clean the surfaces again to remove any flux residues, oxidation, or other contaminants that may have accumulated. This step is crucial for ensuring a proper repair. Use a suitable cleaning solution and a clean brush or cloth to wipe the surfaces clean.
3. Resoldering
Once the surfaces are clean, it’s time to resolder the joint. Apply a small amount of fresh flux to the cleaned surfaces, and then heat the joint with the soldering iron. When the flux starts to bubble and activate, feed a small amount of solder into the joint.
4. Inspection and Testing
After resoldering, inspect the joint visually to make sure it looks good and meets the criteria for a proper solder joint. Then, use testing equipment to verify the electrical connection. Check for continuity and make sure the joint is conducting electricity properly. If any issues are found, repeat the desoldering, cleaning, and resoldering process until the joint is fixed.
Trust PCB Assembly Service Provider – EBest Circuit (Best Technology)
Avoiding cold solder joints isn’t just about skills—it’s also about choosing the right PCB assembly partner. At EBest Circuit (Best Technology), we follow strict quality processes to ensure every joint is clean, strong, and reliable. Here’s how we guarantee excellence:
- Automated Soldering Equipment: Reflow ovens, selective soldering, and wave soldering eliminate manual errors.
- X-ray and AOI Inspection: We detect hidden cold joints and ensure solid connections throughout.
- Skilled Technicians: Our team is trained to international IPC standards, ensuring precision with every solder joint.
- Fast Prototyping and Mass Production: Whether you’re scaling up or fine-tuning, we support your project at every stage.
Need flawless assembly for your next project? Contact EBest Circuit (Best Technology) today for a quote or consultation. Let’s build something reliable—together.
FAQs
1. What is a cold solder joint in simple terms?
It’s a weak or poorly connected solder point that didn’t heat properly and can fail over time.
2. Are cold solder joints dangerous?
Yes, they can cause circuits to fail, especially in safety-critical systems like medical or automotive electronics.
3. Can cold solder joints be fixed easily?
Yes, with the right tools, you can reheat and repair them quickly.
4. What does a cold solder joint look like?
It often appears dull, cracked, grainy, or uneven—unlike a shiny, smooth good joint.
5. Can a PCB test miss a cold solder joint?
Yes, especially if the fault is intermittent. That’s why visual inspection and X-ray are important.
Tags: cold solder joint, cold solder joint causes, cold solder joints